2006/444/ES2006/444/ES: Rozhodnutí Rady ze dne 13. března 2006 o přistoupení Společenství k předpisu č. 55 Evropské hospodářské komise Organizace spojených národů obsahujícímu jednotná ustanovení pro schvalování typu součástí mechanických spojovacích zařízení jízdních souprav vozidel (Text s významem pro EHP)
| Publikováno: | Úř. věst. L 181, 4.7.2006, s. 53-110 | Druh předpisu: | Rozhodnutí |
| Přijato: | 13. března 2006 | Autor předpisu: | Rada Evropské unie |
| Platnost od: | 13. března 2006 | Nabývá účinnosti: | 13. března 2006 |
| Platnost předpisu: | Ano | Pozbývá platnosti: | |
Text předpisu s celou hlavičkou je dostupný pouze pro registrované uživatele.
ROZHODNUTÍ RADY
ze dne 13. března 2006
o přistoupení Společenství k předpisu č. 55 Evropské hospodářské komise Organizace spojených národů obsahujícímu jednotná ustanovení pro schvalování typu součástí mechanických spojovacích zařízení jízdních souprav vozidel
(Text s významem pro EHP)
(2006/444/ES)
RADA EVROPSKÉ UNIE,
s ohledem na Smlouvu o založení Evropského společenství,
s ohledem na rozhodnutí Rady 97/836/ES ze dne 27. listopadu 1997 o přistoupení Evropského společenství k dohodě Evropské hospodářské komise Organizace spojených národů o přijetí jednotných technických pravidel pro kolová vozidla, zařízení a části, které se mohou montovat a/nebo užívat na kolových vozidlech, a o podmínkách pro vzájemné uznávání schválení typu udělených na základě těchto pravidel (revidovaná dohoda z roku 1958) (1), a zejména na čl. 3 odst. 3 a čl. 4 odst. 2 druhou odrážku uvedeného rozhodnutí,
s ohledem na návrh Komise,
s ohledem na souhlas Evropského parlamentu (2),
vzhledem k těmto důvodům:
|
(1) |
Normalizované požadavky předpisu č. 55 (3) obsahujícího jednotná ustanovení pro schvalování typu součástí mechanických spojovacích zařízení jízdních souprav vozidel se zaměřují zejména na odstranění technických překážek při obchodování s motorovými vozidly mezi smluvními stranami a na zaručení vysoké úrovně bezpečnosti při používání vozidel. |
|
(2) |
Předpis č. 55 nebyl zahrnut do přílohy II rozhodnutí 97/836/ES, protože nedodržoval technické požadavky a specifikace Společenství v okamžiku jeho přistoupení k revidované dohodě z roku 1958. |
|
(3) |
Ve světle následných změn může být předpis č. 55 začleněn do systému Společenství pro schvalování typu motorových vozidel, |
ROZHODLA TAKTO:
Článek 1
1. Společenství použije předpis č. 55 Evropské hospodářské komise Organizace spojených národů obsahující jednotná ustanovení pro schvalování typu součástí mechanických spojovacích zařízení jízdních souprav vozidel.
2. Znění předpisu se připojuje k tomuto rozhodnutí.
Článek 2
Předpis č. 55 se začleňuje do systému Společenství pro schvalování typu motorových vozidel.
Článek 3
Komise oznámí toto rozhodnutí generálnímu tajemníkovi Organizace spojených národů.
V Bruselu dne 13. března 2006.
Za Radu
předseda
M. BARTENSTEIN
(1) Úř. věst. L 346, 17.12.1997, s. 78.
(2) Dosud nezveřejněné v Úředním věstníku.
(3) Dokument OSN E/ECE/324, E/ECE/TRANS/505, Rev. 1/Add. 54/Rev. 1, a oprava č. 1.
AGREEMENT
Concerning the adoption of uniform technical prescriptions for wheeled vehicles, equipment and parts which can be fitted and/or be used on wheeled vehicles and the conditions for reciprocal recognition of approvals granted on the basis of these prescriptions (1)
(Revision 2, including the amendments which entered into force on 16 October 1995)
(1) Former title of the Agreement.
Addendum 54:
REGULATION No 55
Revised version providing Revision 1 consolidated with Corrigendum 1 (1)
Uniform provisions concerning the approval of mechanical coupling components of combinations of vehicles
(1) Corrigendum 1 to the 01 series of amendments, subject of depositary notification C.N.602.2002.TREATIES-1 dated 13 June 2002.
(Acts whose publication is obligatory)
Regulation No 55 of the Economic Commission for Europe of the United Nations (UN/ECE).
Uniform provisions concerning the approval of mechanical coupling components of combinations of vehicles.
1. SCOPE
|
1.1. |
This Regulation lays down the requirements which mechanical coupling devices and components shall meet in order to be regarded internationally as being mutually compatible. |
|
1.2. |
This Regulation applies to devices and components intended for: |
|
1.2.1. |
motor vehicles and trailers intended to form a combination of vehicles (1); |
|
1.2.2. |
motor vehicles and trailers intended to form articulated vehicles (1), where the vertical load imposed on the motor vehicle by the trailer does not exceed 200 kN. |
|
1.3. |
This Regulation applies to: |
|
1.3.1. |
standard devices and components as defined in paragraph 2.3.; |
|
1.3.2. |
non-standard devices and components as defined in paragraph 2.4.; |
|
1.3.3. |
non-standard miscellaneous devices and components as defined in paragraph 2.5. |
2. DEFINITIONS
For the purposes of this Regulation:
|
2.1. |
„mechanical coupling devices and components means” all those items on the frame, load-bearing parts of the bodywork and the chassis of the motor vehicle and trailer by means of which they are connected together to form the combination of vehicles or the articulated vehicles. Fixed or detachable parts for the attachment or operation of the mechanical coupling device or component are included. |
|
2.2. |
automatic coupling requirement is achieved if reversing the towing vehicle against the trailer is sufficient to engage the coupling completely, to lock it automatically and to indicate proper engagement of the locking devices without any external intervention. In the case of hook type couplings automatic coupling requirement is achieved if opening and closing of the coupling locking device takes place without any external intervention when the drawbar eye is inserted into the hook. |
|
2.3. |
standard mechanical coupling devices and components conform to standard dimensions and characteristic values as given in this Regulation. They are interchangeable within their class, independent of manufacturer. |
|
2.4. |
non-standard mechanical coupling devices and components do not conform in all respects to the standard dimensions and characteristic values given in this Regulation but can be connected to standard coupling devices and components in the relevant class. |
|
2.5. |
non-standard miscellaneous mechanical coupling devices and components do not conform to standard dimensions and characteristic values as given in this Regulation and cannot be connected to standard coupling devices and components. They include, for example, devices which do not correspond with any of the Classes A to L and T listed in paragraph 2.6. such as those intended for special, heavy transport use and miscellaneous devices conforming to existing national standards. |
|
2.6. |
mechanical coupling devices and components are classified according to type as follows: |
|
2.6.1. |
|
|
2.6.1.1. |
|
|
2.6.1.2. |
|
|
2.6.2. |
|
|
2.6.2.1. |
|
|
2.6.3. |
|
|
2.6.3.1. |
|
|
2.6.3.2. |
|
|
2.6.4. |
|
|
2.6.4.1. |
|
|
2.6.4.2. |
|
|
2.6.4.3. |
|
|
2.6.4.4. |
|
|
2.6.5. |
|
|
2.6.6. |
|
|
2.6.7. |
|
|
2.6.7.1. |
|
|
2.6.7.2. |
|
|
2.6.8. |
|
|
2.6.8.1. |
|
|
2.6.9. |
|
|
2.6.10. |
|
|
2.6.11. |
|
|
2.6.12. |
|
|
2.6.13. |
|
|
2.7. |
Steering wedges are devices or components mounted on semitrailers which control positive steering of the trailer in conjunction with the fifth wheel coupling. |
|
2.8. |
Remote control systems are devices and components which enable the coupling device to be operated from the side of the vehicle or from the driving cab of the vehicle. |
|
2.9. |
Remote indicators are devices and components which give an indication in the vehicle cab that coupling has been effected and that the locking devices have engaged. |
|
2.10. |
„type of coupling device or component” means a device or component which does not differ in such essential respects as: |
|
2.10.1. |
the manufacturer's or supplier s trade name or mark; |
|
2.10.2. |
the class of coupling as defined in paragraph 2.6.; |
|
2.10.3. |
the external shape, principal dimensions or fundamental difference in design including materials used; and |
|
2.10.4. |
the characteristic values D, Dc, S, V and U as defined in paragraph 2.11. |
|
2.11. |
The characteristic values D, Dc, S, V and U are defined or determined as: |
|
2.11.1. |
The D or Dc value is the theoretical reference value for the horizontal forces in the towing vehicle and the trailer and is used as the basis for horizontal loads in the dynamic tests. For mechanical coupling devices and components not designed to support imposed vertical loads, the value is: D = g ((T · R)/(T + R)) kN For mechanical coupling devices and components for centre axle trailers as defined in 2.13, the value is: Dc = g ((T · C)/(T + C)) kN For fifth wheel couplings of Class G, fifth wheel coupling pins of Class H and mounting plates of Class J, as defined in paragraph 2.6., the value is: D = g ((0,6 · T ·R)/(T + R-U)) kN where:
|
|
2.11.2. |
The U value is the vertical mass, in tonnes, imposed on the fifth wheel coupling by the semitrailer of technically permissible maximum mass (2) |
|
2.11.3. |
The S value is the vertical mass, in kilograms, imposed on the coupling, under static conditions, by the centre axle trailer, as defined in paragraph 2.13., of technically permissible maximum mass (2) |
|
2.11.4. |
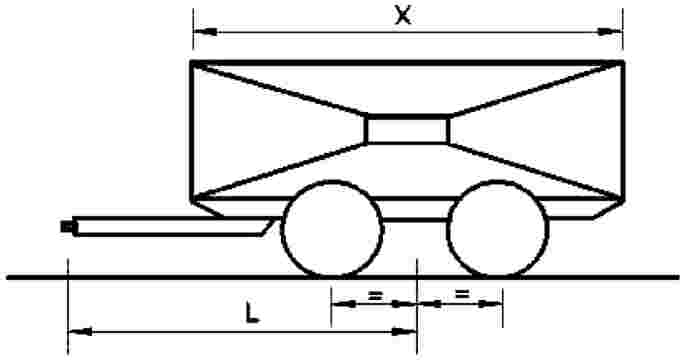
The V value is the theoretical reference value of the amplitude of the vertical force imposed on the coupling by the centre axle trailer of technically permissible maximum mass greater than 3,5 tonnes. The V value is used as the basis for vertical forces in the dynamic tests. V = (a · C · X2) / L2 (See the Note below) where:
For air suspension (or suspension systems with equivalent damping characteristics) a = 1n8 m/s2 For other types of suspension: a = 2n4 m/s2
Note: (X2 / L2) ≥ 1,0 (If less than 1,0, the value of 1,0 shall be used) |
Figure 1
Dimensions of the centre axle trailer
|
2.12. |
Symbols and definitions used in annex 6 of this Regulation.
|
||||||||||||||||||||||||||||||||||||||||||||||||||||||||||||||||||||||||||||||||||
|
2.13. |
„Centre axle trailer” means a trailer having a drawbar which cannot move in a vertical plane independent of the trailer and having an axle or axles positioned close to the centre of gravity of the trailer, when uniformly loaded. The vertical load imposed on the coupling of the towing vehicle shall not exceed 10 per cent of the maximum mass of the trailer, or 1 000 kg, whichever is the lesser. The maximum mass of the centre axle trailer means the total mass transmitted to the ground by the axle or axles of the trailer when coupled to a towing vehicle and when loaded to the technically permissible maximum mass (4). |
|
2.14. |
„Positive mechanical engagement” means that the design and geometry of a device and its component parts shall be such that it will not open or disengage under the action of any forces or components of forces to which it is subject during normal use or testing. |
|
2.15. |
„Vehicle type” means vehicles which do not differ in such essential respects as the structure, dimensions, shape and materials in areas to which the mechanical coupling device or component is affixed. This applies to both the towing vehicle and trailer. |
3. APPLICATION FOR APPROVAL OF A MECHANICAL COUPLING DEVICE OR COMPONENT
|
3.1. |
The application for approval shall be submitted by the holder of the trade name or mark or by his duly accredited representative. |
|
3.2. |
For each type of mechanical coupling device or component the application shall be accompanied by the following information, for example, by means of the Communication form given in annex 1: |
|
3.2.1. |
details of all manufacturer's or supplier's trade names or marks to be applied to the coupling device or component; |
|
3.2.2. |
three sets of drawings which are sufficiently detailed to define the device or component and which specify how it is to be fitted to the vehicle; the drawings shall show the position and space provided for the approval number and other marking as given in paragraph 7.; |
|
3.2.3. |
a statement of the values of D, Dc, S, V and U as applicable and as defined in paragraph 2.11. For Class A towing brackets a statement of the maximum permissible towing vehicle and trailer masses and the maximum permissible static vertical imposed load on the tow ball as advised by the manufacturer of the towing vehicle; |
|
3.2.3.1. |
The characteristic values shall be at least equal to those applicable to the maximum permissible towing vehicle, trailer and combination masses. |
|
3.2.4. |
a detailed technical description of the device or component, specifying, in particular, the type and the materials used; |
|
3.2.5. |
restrictions on the vehicles to which the coupling may be fitted — see annex 1, paragraph 12 and annex 5, paragraph 3.4.; |
|
3.2.6. |
one sample, plus additional samples as requested by the type approval authority or technical service; |
|
3.2.7. |
all samples shall be fully finished with the final surface treatment applied. However, if the final treatment is by painting or epoxy powder coating, this should be omitted; |
|
3.2.8. |
in the case of a mechanical coupling device or component designed for a specific vehicle type, the manufacturer of the device or component shall also submit the installation data given by the vehicle manufacturer. The approval authority or technical service may also request that a vehicle representative of the type be submitted. |
4. GENERAL REQUIREMENTS FOR MECHANICAL COUPLING DEVICES OR COMPONENTS
|
4.1. |
Each sample shall conform to the dimensional and strength specifications set out in annexes 5 and 6. Following the tests specified in annex 6 there shall not be any cracks, fractures or any excessive permanent distortion which would be detrimental to the satisfactory operation of the device or component. |
|
4.2. |
All parts of the mechanical coupling device or component whose failure could result in separation of the vehicle and trailer shall be made of steel. Other materials may be used provided that equivalence has been demonstrated by the manufacturer to the satisfaction of the type approval authority or technical service of the Contracting Party applying this Regulation. |
|
4.3. |
The mechanical coupling devices or components shall be safe to operate and coupling and uncoupling shall be possible by one person without the use of tools. With the exception of Class T couplings only devices which allow automatic coupling shall be allowed for the coupling of trailers having a maximum technically permissible mass greater than 3,5 tonnes. |
|
4.4. |
The mechanical coupling devices or components shall be designed and manufactured such that in normal use and with correct maintenance and replacement of wearing parts they will continue to function satisfactorily and retain the characteristics prescribed by this Regulation. |
|
4.5. |
All mechanical coupling devices or components shall be designed to have positive mechanical engagement and the closed position shall be locked at least once by further positive mechanical engagement unless further requirements are stated in annex 5. Alternatively there may be two or more separate arrangements to ensure the integrity of the device but each arrangement shall be designed to have positive mechanical engagement and shall be tested individually to any requirements given in annex 6. Positive mechanical engagement shall be as defined in paragraph 2.14. Spring forces may be used only to close the device and to prevent the effects of vibration from causing component parts of the device to move to positions where it may open or disengage. The failure or omission of any one single spring shall not allow the complete device to open or disengage. |
|
4.6. |
Every device or component shall be accompanied by installation and operating instructions giving sufficient information for any competent person to install it correctly on the vehicle and operate it properly — see also annex 7. The instructions shall be in at least the language of the country in which it will be offered for sale. In the case of devices and components supplied for original equipment fitting by a vehicle manufacturer or bodybuilder, installation instructions may be dispensed with but the vehicle manufacturer or bodybuilder will be responsible for ensuring that the vehicle operator is supplied with the necessary instructions for correct operation of the coupling device or component. |
|
4.7. |
For devices and components of Class A, or Class S, if applicable, for use with trailers of maximum permissible mass not exceeding 3,5 tonnes, and which are produced by manufacturers not having any association with the vehicle manufacturer and where the devices and components are intended for fitting in the after-market, the height and other installation features of the coupling shall, in all cases, be verified by the type approval authority or technical service in accordance with annex 7, paragraph 1. |
|
4.8. |
For heavy duty and other non-standard miscellaneous coupling devices or components, Class S and Class T, the relevant requirements in annexes 5, 6 and 7 for the closest standard or non-standard device or component shall be used. |
5. APPLICATION FOR APPROVAL OF A VEHICLE FITTED WITH A MECHANICAL COUPLING DEVICE OR COMPONENT
|
5.1. |
Where a vehicle manufacturer applies for approval of a vehicle fitted with a mechanical coupling device or component or authorises the use of a vehicle for towing any form of trailer, then, at the request of a bona fide applicant for possible type approval for a mechanical coupling device or component, or of the type approval authority or technical service of a Contracting Party, the vehicle manufacturer shall readily make available to that inquirer or authority or technical service, such information as required in paragraph 5.3. below, to enable a manufacturer of a coupling device or component to properly design and manufacture a mechanical coupling device or component for that vehicle. At the request of a bona fide applicant for possible type approval for a mechanical coupling device or component, any information given in paragraph 5.3. below which is held by the type approval authority shall be released to that applicant. |
|
5.2. |
The application for approval of a vehicle type with regard to the fitting of a mechanical coupling device or component shall be submitted by the vehicle manufacturer or by his duly accredited representative. |
|
5.3. |
It shall be accompanied by the following information to enable the type approval authority to complete the communication form given in annex 2. |
|
5.3.1. |
a detailed description of the vehicle type and of the mechanical coupling device or component and, at the request of the type approval authority or technical service, a copy of the approval form for the device or component; |
|
5.3.2. |
The information shall also include the maximum permissible masses of the towing and towed vehicles, the distribution of the maximum permissible mass of the towing vehicle between the axles, the maximum permissible axle masses, the maximum permissible vertical loading to be imposed on the rear of the towing vehicle and details and/or drawings of the installation mounting points for the device or component and of any additional reinforcing plates, support brackets and so on, necessary for safe attachment of the mechanical coupling device or component to the towing vehicle; |
|
5.3.2.1. |
the loading condition at which the height of the tow ball of M1 category vehicles is to be measured — see paragraph 2 of annex 7, appendix 1. |
|
5.3.3. |
three sets of drawings which are sufficiently detailed to identify the device or component and which specify how it is to be fitted to the vehicle; the drawings shall show the position and space provided for the approval number and other marking as given in paragraph 7.; |
|
5.3.4. |
a detailed technical description of the device or component, specifying, in particular, the type and the materials used; |
|
5.3.5. |
a statement of the values of D, Dc, S, V and U as applicable and as defined in paragraph 2.11.; |
|
5.3.5.1. |
The characteristic values shall be at least equal to those applicable to the maximum permissible towing vehicle, trailer and combination masses. |
|
5.3.6. |
a vehicle, representative of the type to be approved and fitted with a mechanical coupling device, shall be submitted to the type approval authority or technical service which may also request additional samples of the device or component; |
|
5.3.7. |
a vehicle not having all of the components appropriate to the type may be accepted provided that the applicant can show, to the satisfaction of the type approval authority or technical service, that the absence of the components does not have any effect on the results of the inspection as far as the requirements of this Regulation are concerned. |
6. GENERAL REQUIREMENTS FOR VEHICLES FITTED WITH A MECHANICAL COUPLING DEVICE OR COMPONENT
|
6.1. |
The mechanical coupling device or component fitted to the vehicle shall be approved in accordance with the requirements of paragraphs 3 and 4 and annexes 5 and 6 of this Regulation. |
|
6.2. |
The installation of the mechanical coupling device or component shall meet the requirements of annex 7 to this Regulation. |
|
6.3. |
Operating instructions shall be provided for use of the coupling device or component which shall contain any special instructions for operations which are different from those normally associated with the type of coupling device or component and instructions for coupling and uncoupling with different modes of operation, for example, at various angles between the towing and towed vehicles. Each vehicle shall be accompanied by these operating instructions which shall be at least in the language of the country in which it will be offered for sale. |
7. MARKINGS
|
7.1. |
Types of mechanical coupling devices and components submitted for approval shall bear the trade name or mark of the manufacturer, supplier or applicant. |
|
7.2. |
There shall be a sufficiently large space for application of the approval mark referred to in paragraph 8.5 and shown in annex 3. This space shall be shown on the drawings referred to in paragraph 3.2.2. |
|
7.3. |
Adjacent to the approval mark referred to in paragraphs 7.2 and 8.5, the mechanical coupling device or component shall be marked with the class of coupling, as defined in paragraph 2.6 and the relevant characteristic values as defined in paragraph 2.11 and shown in annex 4. The position for these markings shall be shown on the drawings referred to in paragraph 3.2.2. The characteristic values need not be marked in cases where those values are defined in the classification given in this Regulation, for example, Classes A50-1 to A50-5. |
|
7.4. |
Where the mechanical coupling device or component is approved for alternative characteristic values within the same class of coupling or device, a maximum of two alternatives shall be marked on the device or component. |
|
7.5. |
If the application of the mechanical coupling device or component is restricted in any way, for example, if it is not to be used with steering wedges, then that restriction shall be marked on the device or component. |
|
7.6. |
All markings shall be permanent and legible when the device or component is installed on the vehicle. |
8. APPROVAL
|
8.1. |
If the sample(s) of a type of mechanical coupling device or component meets (meet) the requirements of this Regulation, approval shall be granted subject to the requirements of paragraph 10 being satisfactorily met. |
|
8.2. |
An approval number shall be assigned to each type approved. Its first two digits (at present 01) shall indicate the series of amendments incorporating the most recent major technical amendments made to the Regulation at the time of issue of the approval. The same Contracting Party may not assign the same number to another type of device or component referred to in this Regulation. |
|
8.3. |
Notice of approval or of extension, refusal or withdrawal of approval or of production definitely discontinued, relating to a type of mechanical coupling device or component approved pursuant to this Regulation, shall be communicated to the Parties to the 1958 Agreement applying this Regulation, by means of a communication form conforming to the model in either annex 1 or annex 2 to this Regulation. |
|
8.4. |
In addition to the mark prescribed in paragraph 7.1., there shall be affixed to every mechanical coupling device or component approved under this Regulation, in the space referred to in paragraph 7.2., an approval mark as described in paragraph 8.5. |
|
8.5. |
The approval mark shall be an international mark comprising: |
|
8.5.1. |
a circle surrounding the letter „E” followed by the distinguishing number of the country which has granted approval (5); |
|
8.5.2. |
the approval number prescribed in paragraph 8.2.; |
|
8.5.3. |
the approval mark and number shall be arranged as shown in the example in annex 3. |
9. MODIFICATIONS OF THE MECHANICAL COUPLING DEVICE OR COMPONENT, OR OF THE VEHICLE AND EXTENSION OF APPROVAL
|
9.1. |
Any modification to the type of mechanical coupling device or component, or of the vehicle as defined in paragraph 2.10 shall be notified to the type approval authority or technical service which granted the approval. The type approval authority or technical service may then either: |
|
9.1.1. |
consider that the modifications are unlikely to have any appreciable adverse effect and that in any case the device, component or vehicle still conforms to requirements; or |
|
9.1.2. |
require a further test report. |
|
9.2. |
Confirmation of, or refusal of approval, specifying the modification, shall be communicated by the procedure prescribed in paragraph 8.3 to the Contracting Parties applying this Regulation. |
|
9.3. |
The type approval authority or technical service issuing an extension of approval shall assign a series number for such an extension and shall inform the other Contracting Parties applying this Regulation by the procedure prescribed in paragraph 8.3. |
10. CONFORMITY OF PRODUCTION PROCEDURES
The conformity of production procedures shall comply with those set out in the Agreement, Appendix 2 (E/ECE/324 — E/ECE/TRANS/505/Rev.2), with the following requirements:
|
10.1. |
The holder of the approval must ensure that results of the conformity of production tests are recorded and that the annexed documents remain available for a period determined in agreement with the approval authority or technical service. This period must not exceed 10 years counted from the time when production is definitely discontinued. |
|
10.2. |
The type approval authority or technical service which has granted type approval may at any time verify the conformity control methods applied in each production facility. The normal frequency of these verifications shall be once every two years. |
11. PENALTIES FOR NON-CONFORMITY OF PRODUCTION
|
11.1. |
The approval granted in respect of a type of mechanical coupling device or component pursuant to this Regulation may be withdrawn if the requirements are not complied with or if a device or component bearing the approval mark does not conform to the type approved. |
|
11.2. |
If a Contracting Party to the Agreement applying this Regulation withdraws an approval it has previously granted, it shall forthwith so notify the other Contracting Parties applying this Regulation by means of a communication form conforming to the model in either annex 1 or annex 2 to this Regulation. |
12. PRODUCTION DEFINITELY DISCONTINUED
If the holder of the approval completely ceases to manufacture a type of mechanical coupling device or component approved in accordance with this Regulation, he shall so inform the type approval authority or technical service which granted the approval. Upon receiving the relevant communication, that type approval authority or technical service shall inform thereof the other Contracting Parties to the 1958 Agreement applying this Regulation by means of a communication form conforming to the model in either annex 1 or annex 2 to this Regulation.
13. TRANSITIONAL PROVISIONS
Until the United Nations Secretary-General is notified otherwise, Contracting Parties applying this Regulation that are Member States of the European Community (at the time of adoption of the 01 series of amendments, Italy, Netherlands, Belgium, United Kingdom, Luxembourg, Finland and Greece) declare that, in relation to mechanical coupling devices and components, they will only be bound by the obligations of the Agreement to which this Regulation is annexed with respect to such devices and components intended for vehicles of categories other than M1.
14. NAMES AND ADDRESSES OF TECHNICAL SERVICES RESPONSIBLE FOR APPROVAL TESTS AND OF ADMINISTRATIVE DEPARTMENTS
|
14.1. |
The Contracting Parties to the 1958 Agreement applying this Regulation shall communicate to the United Nations Secretariat the names and addresses of the technical services responsible for conducting approval tests and of the administrative departments which grant approval and to which forms certifying approval or extension or refusal or withdrawal of approval, or production definitely discontinued, issued in other countries, are to be sent. |
(1) Within the meaning of the Convention on Road Traffic (Vienna, 1968, Article 1, sub-paragraphs (t) and (u)).
(2) The mass T and R and the technically permissible maximum mass, may be greater than the permissible maximum mass prescribed by national legislation.
(3) See definitions in Regulation No 13 annexed to the 1958 Agreement concerning the Adoption of Uniform Technical Prescriptions for Wheeled Vehicles, Equipment and Parts which can be Fitted and/or be Used on Wheeled Vehicles and the Conditions for Reciprocal Recognition of Approvals Granted on the Basis of these Prescriptions. The definition is also contained in annex 7 of the Consolidated Resolution on the Construction of Vehicles (R.E.3) (document TRANS/WP.29/78/Rev.1/Amend.2).
(4) The technically permissible mass may be greater than the maximum permissible mass prescribed by national legislation.
(5) 1 for Germany, 2 for France, 3 for Italy, 4 for the Netherlands, 5 for Sweden, 6 for Belgium, 7 for Hungary, 8 for the Czech Republic, 9 for Spain, 10 for Yugoslavia, 11 for the United Kingdom, 12 for Austria, 13 for Luxembourg, 14 for Switzerland, 15 (vacant), 16 for Norway, 17 for Finland, 18 for Denmark, 19 for Romania, 20 for Poland, 21 for Portugal, 22 for the Russian Federation, 23 for Greece, 24 for Ireland, 25 for Croatia, 26 for Slovenia, 27 for Slovakia, 28 for Belarus, 29 for Estonia, 30 (vacant), 31 for Bosnia and Herzegovina, 32 for Latvia, 33 (vacant), 34 for Bulgaria, 35-36 (vacant), 37 for Turkey, 38-39 (vacant), 40 for The former Yugoslav Republic of Macedonia, 41 (vacant), 42 for the European Community (Approvals are granted by its Member States using their respective ECE symbol), 43 for Japan, 44 (vacant), 45 for Australia, 46 for Ukraine and 47 for South Africa. Subsequent numbers shall be assigned in the chronological order in which they ratify or accede to the Agreement concerning the Adoption of Uniform Technical Prescriptions for Wheeled Vehicles, Equipment and Parts which can be Fitted and/or be Used on Wheeled Vehicles and the Conditions for Reciprocal Recognition of Approvals Granted on the Basis of these Prescriptions, or in which they accede to the Agreement, and the numbers thus assigned shall be communicated by the Secretary-General of the United Nations to the Contracting Parties to the Agreement.
ANNEX 1
COMMUNICATION
(maximum format: A4 (210 × 297 mm))
|
|
issued by: |
Name of administration: ………………………………… ………………………………… ………………………………… |
|
concerning: |
APPROVAL GRANTED |
|
|
APPROVAL EXTENDED |
|
|
APPROVAL REFUSED |
|
|
APPROVAL WITHDRAWN |
|
|
PRODUCTION DEFINITELY DISCONTINUED |
of a type of mechanical coupling device or component pursuant to Regulation No 55
Approval No ……………… Extension No ………………
|
1. |
name or mark of the device or component: … |
|
2. |
Manufacturer's name for the type of device or component: … |
|
3. |
Manufacturer's name and address: … |
|
4. |
If applicable, name and address of the manufacturer's representative: … |
|
5. |
Alternative supplier's names or trade marks applied to the device or component: … |
|
6. |
Name and address of company or body taking responsibility for the conformity of production: … |
|
7. |
Submitted for approval on: … |
|
8. |
Technical service responsible for conducting approval tests: … |
|
9. |
Brief description: … |
|
9.1. |
Type and class of device or component: … |
|
9.2. |
Characteristic values: … |
|
9.2.1. |
Primary values: … D … kN Dc … kN S … kg U … tonnes V … kN Alternative values: D … kN Dc … kN S … kg U … tonnes V … kN |
|
9.3. |
For Class A mechanical coupling devices or components, including towing brackets: Vehicle manufacturer's maximum permissible vehicle mass: … kg Distribution of maximum permissible vehicle mass between the axles: … Vehicle manufacturer's maximum permissible towable trailer mass: … kg Vehicle manufacturer's maximum permissible static mass on coupling ball: … kg. Maximum mass of the vehicle, with bodywork, in running order, including coolant, oils, fuel, tools and spare wheel (if supplied) but not including driver: … kg Loading condition under which the tow ball height of a mechanical coupling device fitted to category M1 vehicles is to be measured — see paragraph 2 of annex 7, appendix 1: … |
|
10. |
Instructions for the attachment of the coupling device or component type to the vehicle and photographs or drawings of the mounting points given by the vehicle manufacturer: … |
|
11. |
Information on the fitting of any special reinforcing brackets or plates or spacing components necessary for the attachment of the coupling device or component: … |
|
12. |
Additional information where the use of the coupling device or component is restricted to special types of vehicles — see annex 5, paragraph 3.4. … |
|
13. |
For Class K hook type couplings, details of the drawbar eyes suitable for use with the particular hook type. … |
|
14. |
Date of test report: … |
|
15. |
Number of test report: … |
|
16. |
Approval mark position: … |
|
17. |
Reason(s) for extension of approval: … |
|
18. |
Approval granted/extended/refused/withdrawn: 2/ |
|
19. |
Place: … |
|
20. |
Date: … |
|
21. |
Signature: … |
|
22. |
The list of documents deposited with the Administration Service which has granted approval is annexed to this communication and may be obtained on request. … … |
ANNEX 2
COMMUNICATION
(maximum format: A4 (210 × 297 mm))
|
|
issued by: |
Name of administration: ………………………………… ………………………………… ………………………………… |
|
concerning: |
APPROVAL GRANTED |
|
|
APPROVAL EXTENDED |
|
|
APPROVAL REFUSED |
|
|
APPROVAL WITHDRAWN |
|
|
PRODUCTION DEFINITELY DISCONTINUED |
of a vehicle type with regard to the fitting of a mechanical coupling device or component pursuant to Regulation No 55
Approval No ……………… Extension No ………………
|
1. |
Trade name or mark of vehicle: … |
|
2. |
Vehicle type: … |
|
3. |
Manufacturer's name and address: … |
|
4. |
If applicable, name and address of the manufacturer's representative: … |
|
5. |
Vehicle category, for example, M1, N1: … |
|
6. |
Maximum permissible vehicle mass: … kg Distribution of maximum permissible vehicle mass between the axles: … Maximum permissible towable trailer mass: … kg Maximum permissible static mass on coupling ball: … kg Maximum mass of the vehicle, with bodywork, in running order, including coolant, oils, fuel, tools and spare wheel (if supplied) but not including driver: … kg |
|
7. |
D … kN Dc… kN S … kg U …tonnes V … kN |
|
8. |
Instructions for the attachment of the coupling device or component type to the vehicle and photographs or drawings of the mounting points: … |
|
9. |
Information on the fitting of any special reinforcing brackets or plates or spacing components necessary for the attachment of the coupling device or component: … |
|
10. |
Trade name or mark of the mechanical coupling device or component and the approval number: … |
|
11. |
Class of coupling device or component: … |
|
12. |
Submitted for approval on: … |
|
13. |
Technical service responsible for conducting approval tests: … |
|
14. |
Date of test report: … |
|
15. |
Number of test report: … |
|
16. |
Approval mark position: … |
|
17. |
Reason(s) for extension of approval: … |
|
18. |
Approval granted/extended/refused/withdrawn: … |
|
19. |
Place: … |
|
20. |
Date:… |
|
21. |
Signature: … |
|
22. |
The list of documents deposited with the Administration Service which has granted approval is annexed to this communication and may be obtained on request. … … |
ANNEX 3
EXAMPLE OF AN ARRANGEMENT OF THE APPROVAL MARK
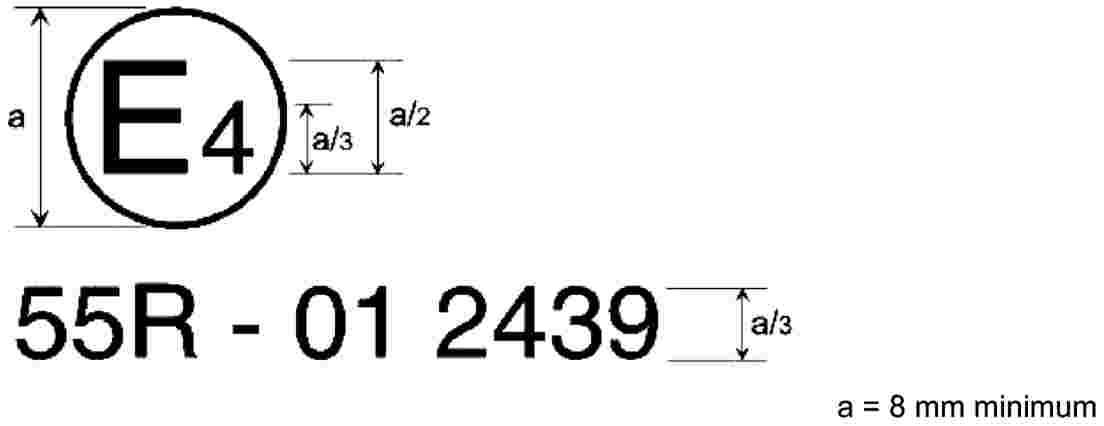
The mechanical coupling device or component or vehicle bearing the approval mark shown above is a device or component approved in the Netherlands (E4), under approval number 2439, meeting the requirements of the 01 series of amendments to this Regulation.
Note: The approval number and additional symbols shall be placed close to the circle and either above or below the letter ‘E’ or to the right or left of that letter. The digits of the approval number shall be on the same side of the letter ‘E’ and face in the same direction. The use of Roman numerals as approval numbers should be avoided so as to prevent any confusion with other symbols.
ANNEX 4
EXAMPLES OF ARRANGEMENTS OF MARKING OF THE CHARACTERISTIC VALUES
|
1. |
All mechanical coupling devices or components shall be marked with the class of the device or component. In addition there shall be marking to indicate the capacity in terms of characteristic values as defined in paragraph 2.11 of this Regulation. |
|
1.1. |
The height of all letters and numbers shall be not less than those of the approval number, that is a/3 where a is 8 mm. |
|
1.2. |
The characteristic values applicable to each device or component which are to be marked are as shown in the table below — see also paragraph 7.3 of this Regulation: TABLE 1 Relevant characteristics values to be marked on coupling devices or components
|
|||||||||||||||||||||||||||||||||||||||||||||||||||||||||||||||||||||||||||||||||||||
ANNEX 5
REQUIREMENTS FOR MECHANICAL COUPLING DEVICES OR COMPONENTS
1. COUPLING BALLS AND TOWING BRACKETS
The requirements stated in paragraphs 1.1 to 1.5 of this annex are applicable to all coupling balls and towing brackets of Class A. Paragraph 1.6 details additional requirements which must be fulfilled by standard 50 mm diameter coupling balls with flange type bolted fixings.
|
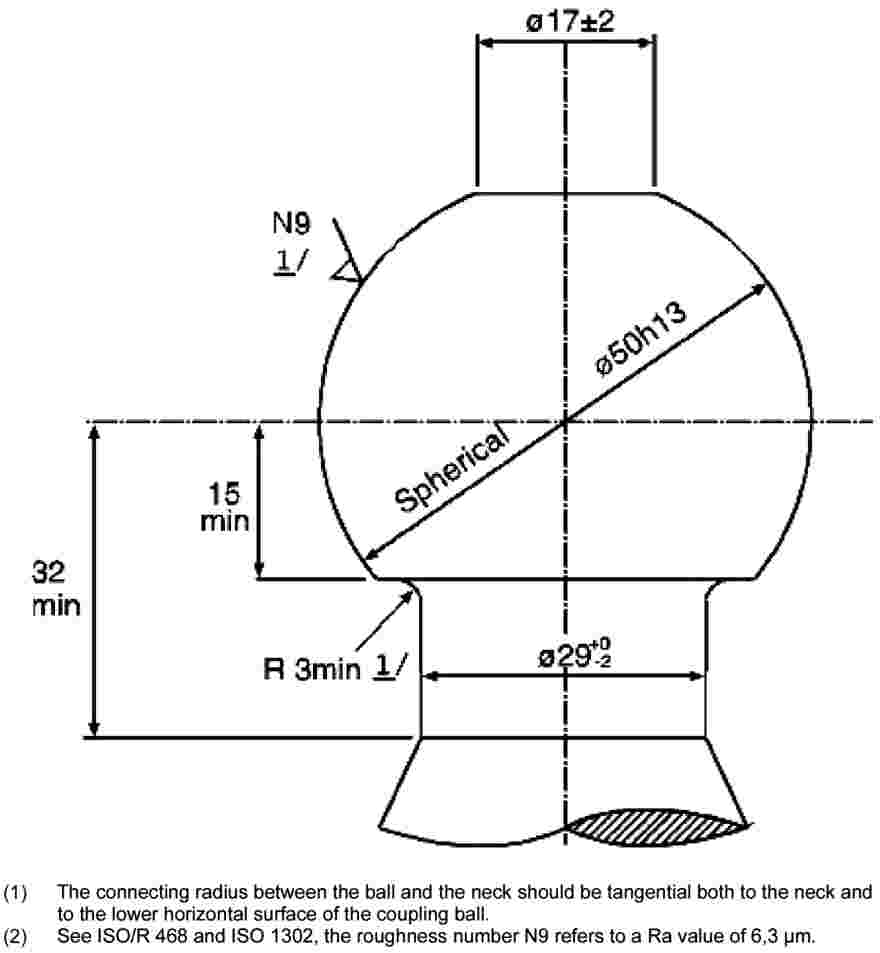
1.1. |
Coupling balls of Class A shall conform to Figure 2 in external shape and external dimensions. |
Figure 2
Coupling ball of Class A
|
1.2. |
The shape and dimensions of towing brackets shall meet the requirements of the vehicle manufacturer concerning the attachment points and additional mounting devices or components if necessary. |
|
1.3. |
Removable coupling balls: |
|
1.3.1. |
In the case of removable coupling balls or components which are not fixed by bolts, for example Class A50-X, the point of connection and the locking arrangement shall be designed for positive mechanical engagement. |
|
1.3.2. |
In the case of a removable coupling ball or component which may be separately approved for use with a variety of towing brackets for different vehicle applications, for example Class A50-X, the clearance space when such a coupling ball is fitted to the towing bracket shall be that prescribed in annex 7, Figure 25. |
|
1.4. |
Coupling balls and towing devices shall be able to satisfy the tests given in annex 6, paragraph 3.1. |
|
1.5. |
Manufacturers of towing brackets shall incorporate attachment points to which either secondary couplings or devices necessary to enable the trailer to be stopped automatically in the event of separation of the main coupling, may be attached. This requirement is necessary to enable the vehicle to comply with the requirements of paragraph 5.2.2.9 of UNECE Regulation No 13 — Uniform Provisions concerning the approval of vehicles of categories M, N and O with regard to braking. |
|
1.5.1. |
The attachment points for a secondary coupling and/or breakaway cable shall be positioned such that when in use, the secondary coupling or breakaway cable does not restrict the normal articulation of the coupling or interfere with the normal inertia braking system operation. A single attachment point shall be positioned within 100 mm of a vertical plane passing through the centre of articulation of the coupling. If this is not practicable, two attachment points shall be provided, one on each side of the vertical centre line and equidistant from the centre line by a maximum of 250 mm. The attachment point(s) shall be as rearward and as high as practicable. |
|
1.6. |
Special requirements for standard coupling balls and flange type towing brackets of Classes A50-1 to A50-5 inclusive: |
|
1.6.1. |
Dimensions of Class A50-1 coupling balls and flange type towing brackets shall be as given in Figure 3 and Table 2. |
|
1.6.2. |
Dimensions of Class A50-2, A50-3, A50-4 and A50-5 coupling balls and flange type towing brackets shall be as given in Figure 4 and Table 2. |
|
1.6.3. |
Coupling balls and flange type towing brackets of the classes A50-1 to A50-5 inclusive, shall be suitable and tested for the characteristic values given in Table 3. |
Figure 3
Dimensions of standard flange type ball couplings of Class A50-1
(see Table 2)
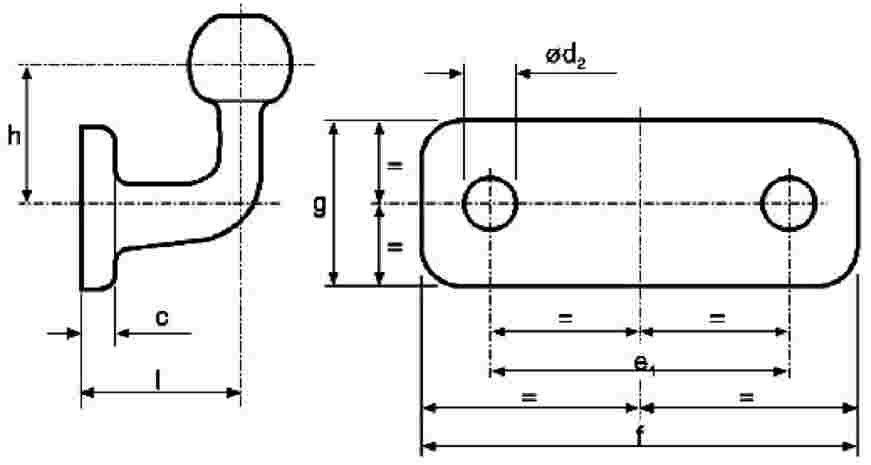
Figure 4
Dimensions of standard flange type ball couplings of Class A50-2 to A50-5
(see Table 2)
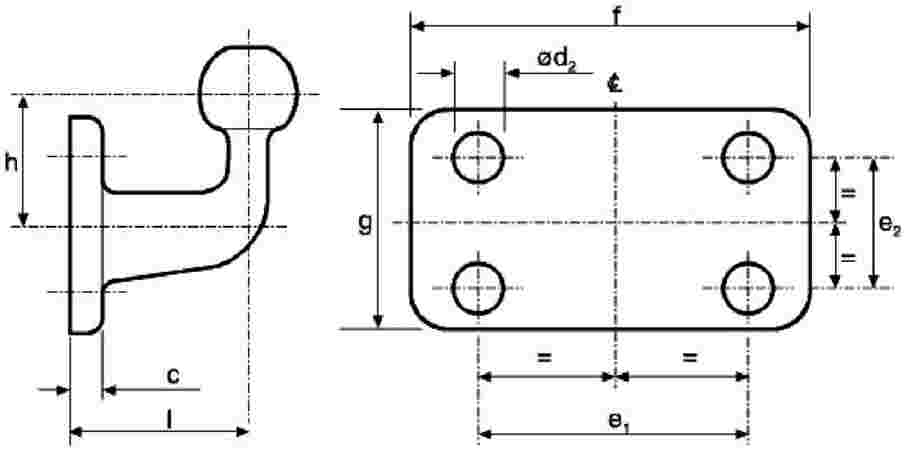
Table 2
Dimensions of standard flange type ball couplings (mm), see Figures 3 and 4.
|
Class |
A50-1 |
A50-2, A50-4 |
A50-3, A50-5 |
Comments |
|
e1 |
90 |
83 |
120 |
±0,5 |
|
e2 |
|
56 |
55 |
±0,5 |
|
d2 |
17 |
10,5 |
15 |
H13 |
|
f |
130 |
110 |
155 |
+6,0 -0 |
|
g |
50 |
85 |
90 |
+6,0 -0 |
|
c |
15 |
15 |
15 |
Maximum |
|
l |
55 |
110 |
120 |
±5,0 |
|
h |
70 |
80 |
80 |
±5,0 |
Table 3
Characteristic values for standard flange type ball couplings
|
Class |
A50-1 |
A50-2 |
A50-3 |
A50-3 |
A50-5 |
|
D |
17 |
20 |
30 |
20 |
30 |
|
S |
120 |
120 |
120 |
150 |
150 |
|
D |
= |
Maximum D value (kN) |
|
S |
= |
Maximum static mass (kg) |
|
1.7. |
Manufacturers of coupling balls and towing brackets intended for fitment in the after-market and which do not have any association with the relevant vehicle manufacturer shall be aware of the requirements for articulation of the coupling given in paragraph 2 of this annex and shall comply with the appropriate requirements in annex 7 to this Regulation. |
2. COUPLING HEADS
|
2.1. |
Coupling heads of Class B50 shall be designed so that they can be used safely with the coupling balls described in paragraph 1 of this annex and thereby retain the prescribed characteristics. Coupling heads shall be designed in such a way that safe coupling is ensured, also taking into account the wear of the coupling devices. |
|
2.2. |
Coupling heads shall be able to satisfy the tests laid down in annex 6, paragraph 3.2. |
|
2.3. |
Any additional device (e.g. braking, stabiliser, etc.) shall not have any adverse effect on the mechanical connection. |
|
2.4. |
When not attached to the vehicle, horizontal rotation of the coupling head shall be at least 90o to each side of the centre line of the coupling ball and mounting described in paragraph 1 of this annex. Simultaneously, there shall be an angle of free vertical movement 20o above and below the horizontal. Also, in conjunction with the horizontal angle of rotation of 90o it shall be possible for there to be 25o of roll in both directions about the horizontal axis. The following articulation shall be possible at all angles of horizontal rotation:
|
3. DRAWBAR COUPLINGS
The requirements of paragraphs 3.1 to 3.6 of this annex are applicable to all drawbar couplings of Class C50. Additional requirements which must be fulfilled by standard drawbar couplings of Classes C50-1 to C50-6 are given in paragraph 3.7.
|
3.1. |
Performance requirements — All drawbar couplings shall be able to satisfy the tests stated in annex 6, paragraph 3.3. |
|
3.2. |
Suitable drawbar eyes — Class C50 drawbar couplings shall be compatible with all Class D50 drawbar eyes and couplings with the specified characteristics. |
|
3.3. |
Jaw Class C50 drawbar couplings shall have a jaw which is designed such that the appropriate drawbar eye is guided into the coupling. If the jaw, or a part supporting the jaw, can pivot about the vertical axis, it shall establish itself automatically in the normal position and with the coupling pin open, be effectively restrained in this position to give satisfactory guidance for the drawbar eye during the coupling procedure. If the jaw, or a part supporting the jaw, can pivot about the horizontal transverse axis, the joint providing the rotation capability shall be restrained in its normal position by a locking torque. The torque shall be sufficient to prevent a force of 200 N acting vertically upwards on the top of the jaw producing any deflection of the joint from its normal position. The locking torque shall be greater than that created by operation of the hand lever described in paragraph 3.6 of this annex. It shall be possible to bring the jaw to its normal position manually. A jaw that pivots about the horizontal transverse axis is only approved for bearing mass, S, of up to 50 kg and a V-value of up to 5 kN. If the jaw, or a part supporting the jaw, is pivoted about the longitudinal axis, the rotation shall be restrained by a locking torque of at least 100 Nm. The minimum required size of the jaw depends on the D value of the coupling:
The external corners of the jaw may be radiused. Smaller jaws are permitted for Class C50-X drawbar couplings if their use is restricted to centre axle trailers up to 3,5 tonnes maximum permissible mass or if the use of a jaw from the above table is impossible due to technical reasons and if, furthermore, there are special circumstances such as visual aids for ensuring safe execution of the automatic coupling procedure and if the field of application is restricted in the approval according to information given by the coupling manufacturer in the communication form shown in annex 1. |
|
3.4. |
Minimum articulation of the coupled drawbar eye The drawbar eye, when coupled to a drawbar coupling but not fitted to a vehicle, shall have the degrees of articulation given below. If part of the articulation is provided by a special joint (Class C50-X drawbar couplings only), the field of application, given in the communication form shown in annex 1, shall be restricted to the cases stated in annex 7, paragraph 1.3.8. |
|
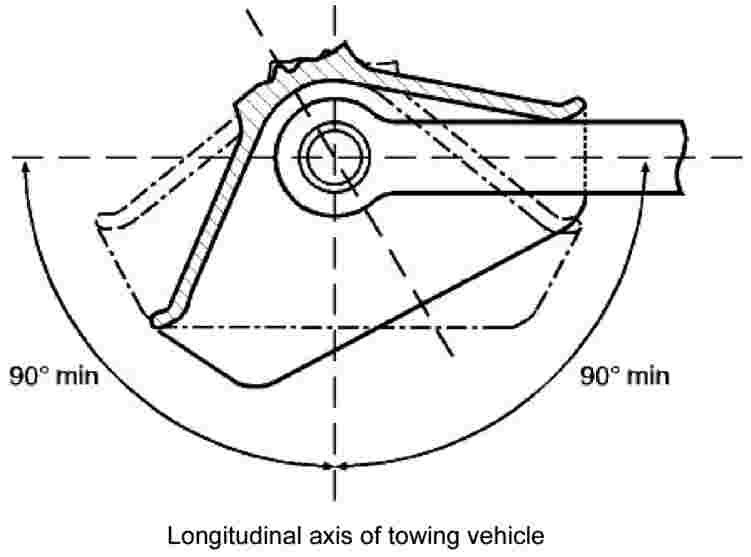
3.4.1. |
±90o horizontally about the vertical axis from the longitudinal axis of the vehicle — see Figure 5. |
Figure 5
Horizontal rotation of the coupled drawbar eye
|
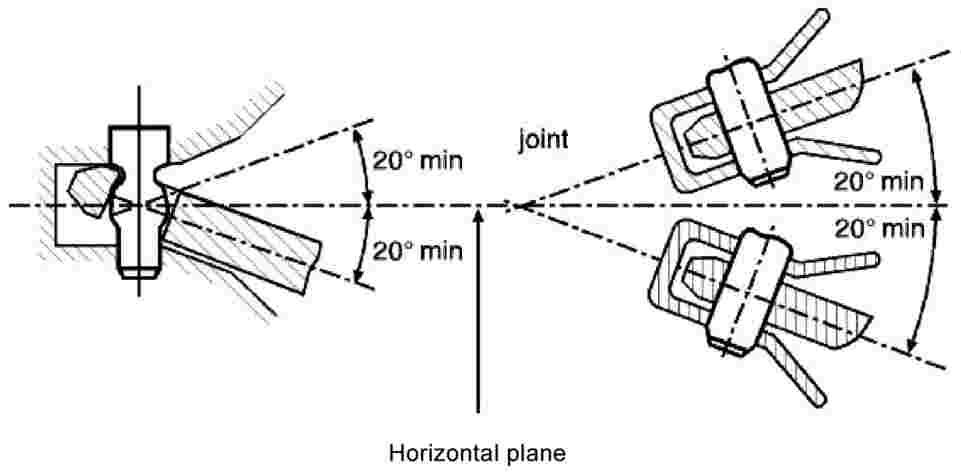
3.4.2. |
±20o vertically about the transverse axis from the horizontal plane of the vehicle — see Figure 6. |
Figure 6
Vertical rotation of the coupled drawbar eye
|
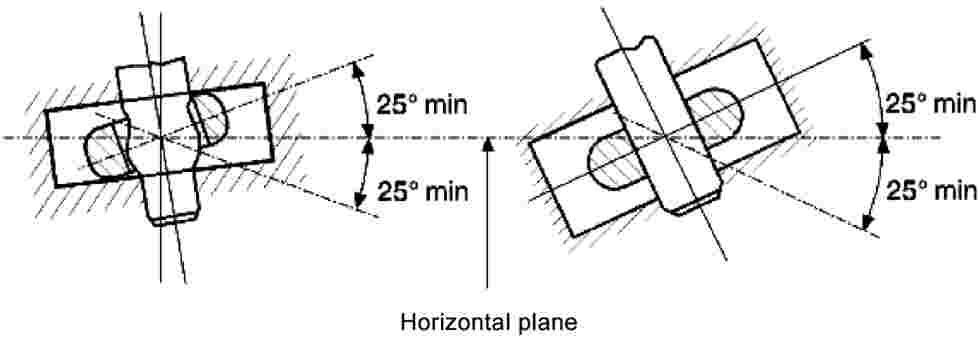
3.4.3. |
±25o axial rotation about the longitudinal axis from the horizontal plane of the vehicle — see Figure 7. |
Figure 7
Axial rotation of the coupled drawbar eye
|
3.5. |
Locking to prevent inadvertent uncoupling: In the closed position the coupling pin shall be locked by two positive mechanical engagement locking devices each of which shall remain effective should the other fail. The closed and locked position of the coupling shall be clearly indicated externally by a mechanical device. It shall be possible to verify the position of the indicator by feel, for example, in the dark. The mechanical indication device shall indicate the engagement of both locking devices (an AND condition). However, it is sufficient for the engagement of only one locking device to be indicated if, in this situation, engagement of the second locking device is an inherent feature of the design. |
|
3.6. |
Hand levers Hand levers shall be of a design suitable for easy use with the end rounded off. The coupling shall not have any sharp edges or points of possible pinching near the hand lever which could result in injury during operation of the coupling. The force needed to release the coupling, measured without the drawbar eye, shall not exceed 250 N perpendicular to the hand lever along the line of operation. |
|
3.7. |
Special requirements for standard drawbar couplings of Class C50-1 to C50-6: |
|
3.7.1. |
The swivel motion of the drawbar eye about the transverse axis must be achieved through the spherical shape of the coupling pin (and not by means of a joint); |
|
3.7.2. |
Tensile and compressive shock loads along the longitudinal axis due to the clearance between the coupling pin and the drawbar eye shall be attenuated by spring and/or damping devices (except C50-1). |
|
3.7.3. |
The dimensions shall be as given in Figure 8 and Table 4. |
|
3.7.4. |
The couplings shall be suitable and tested for the characteristic values given in Table 5. |
|
3.7.5. |
The coupling shall be opened by means of a hand lever at the coupling (no remote control). |
Figure 8
Dimensions of standard drawbar couplings (mm),
(see Table 4)
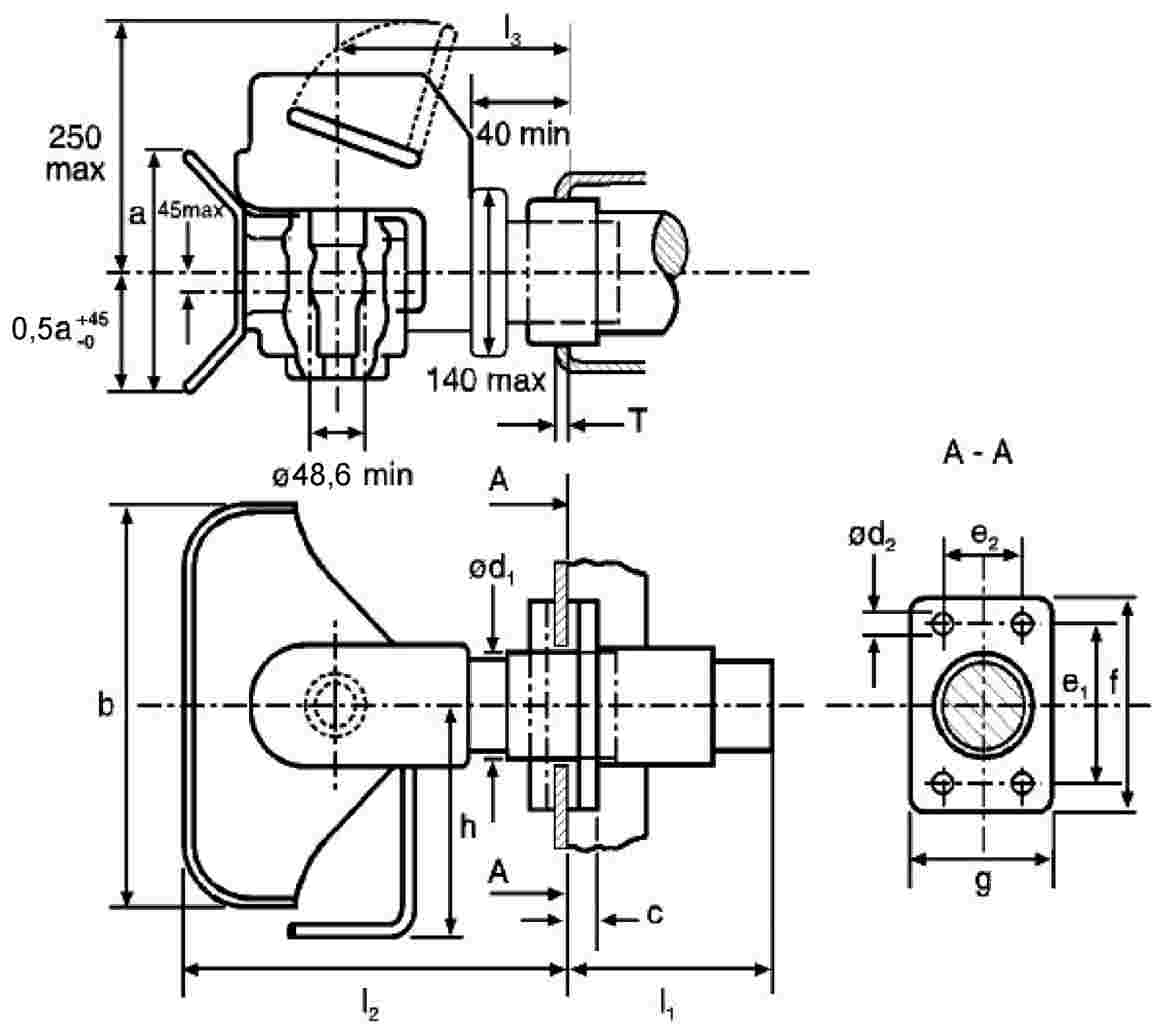
Table 4
Dimensions of standard drawbar couplings (mm), see Figure 8
|
Class |
C50-1 |
C50-2 |
C50-3 |
C50-4 |
C50-5 |
C50-6, C50-7 |
Remarks |
|
e1 |
83 |
83 |
120 |
140 |
160 |
160 |
±0,5 |
|
e2 |
56 |
56 |
55 |
80 |
100 |
100 |
±0,5 |
|
d1 |
|
54 |
74 |
84 |
94 |
94 |
max. |
|
d2 |
10,5 |
10,5 |
15 |
17 |
21 |
21 |
H13 |
|
f |
110 |
110 |
155 |
180 |
140 |
140 |
±3,0 |
|
g |
85 |
85 |
90 |
120 |
140 |
140 |
±3,0 |
|
a |
100 |
170 |
200 |
200 |
200 |
200 |
±20,0 - 0 |
|
b |
150 |
280 |
360 |
360 |
360 |
360 |
±20,0 - 0 |
|
c |
20 |
20 |
24 |
30 |
30 |
30 |
max. |
|
h |
150 |
190 |
265 |
265 |
265 |
265 |
max. |
|
l1 |
|
150 |
250 |
300 |
300 |
300 |
max. |
|
l2 |
150 |
300 |
330 |
330 |
330 |
330 |
max. |
|
l3 |
100 |
160 |
180 |
180 |
180 |
180 |
±20,0 |
|
T |
|
15 |
20 |
35 |
35 |
35 |
max. |
Table 5
Characteristic values for standard drawbar couplings
|
Class |
C50-1 |
C50-2 |
C50-3 |
C50-4 |
C50-5 |
C50-6 |
C50-7 |
|
D |
18 |
25 |
70 |
100 |
130 |
190 |
190 |
|
Dc |
18 |
25 |
50 |
70 |
90 |
120 |
130 |
|
S |
200 |
250 |
650 |
900 |
1000 |
1000 |
1000 |
|
V |
12 |
10 |
18 |
25 |
35 |
50 |
75 |
|
D |
= |
maximum D value (kN) |
|
Dc |
= |
maximum D value (kN) for centre axle trailer applications |
|
S |
= |
maximum static vertical load on coupling (kg) |
|
V |
= |
maximum V value (kN) |
4. DRAWBAR EYES
|
4.1. |
General requirements for drawbar eyes of Class D50: All drawbar eyes of Class D50 shall be able to satisfy the test stated in annex 6, paragraph 3.4. Class D50 drawbar eyes are intended for use with C50 drawbar couplings. Drawbar eyes shall not be able to rotate axially (because the respective couplings can rotate). If Class D50 drawbar eyes are fitted with sleeves, they shall comply with the dimensions shown in Figure 9 (not permitted for Class D50-C) or Figure 10. The sleeves must not be welded into the drawbar eyes. Class D50 drawbar eyes shall have the dimensions given in paragraph 4.2. The form of shank for drawbar eyes of Class D50-X is not specified but for a distance of 210 mm from the centre of the eye the height “h” and the width “b” shall be within the limits given in Table 6. |
Figure 9
Slotted sleeve for Class D50 drawbar eyes
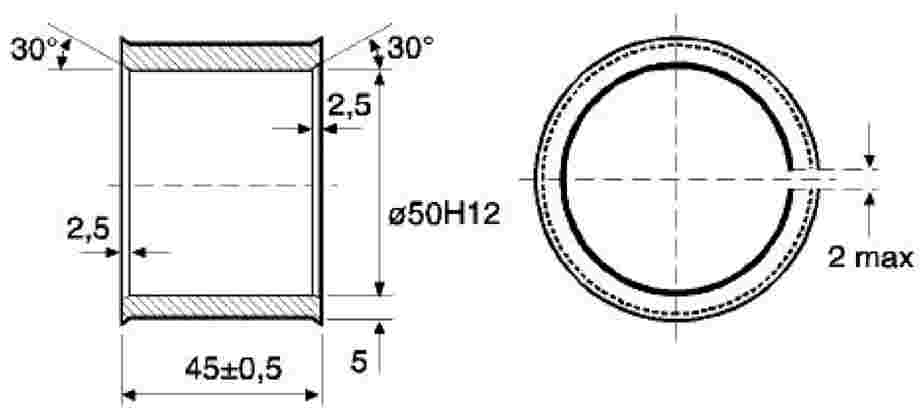
Figure 10
Non-slotted sleeve for Class D50-C drawbar eyes
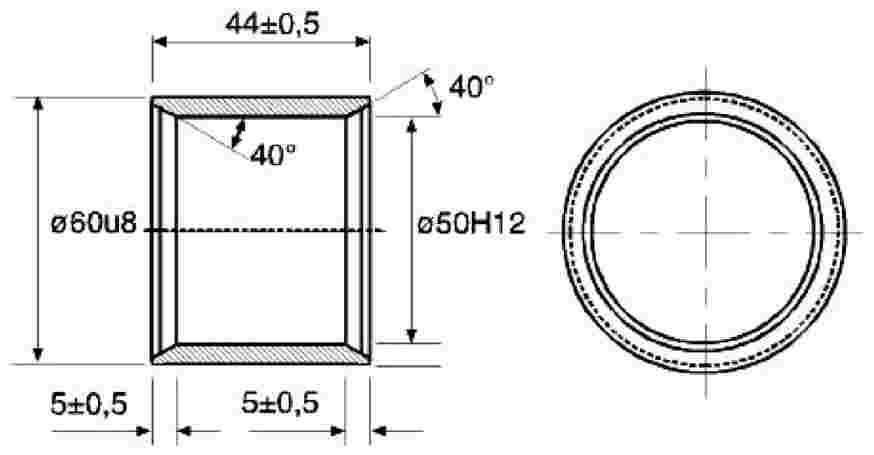
Table 6
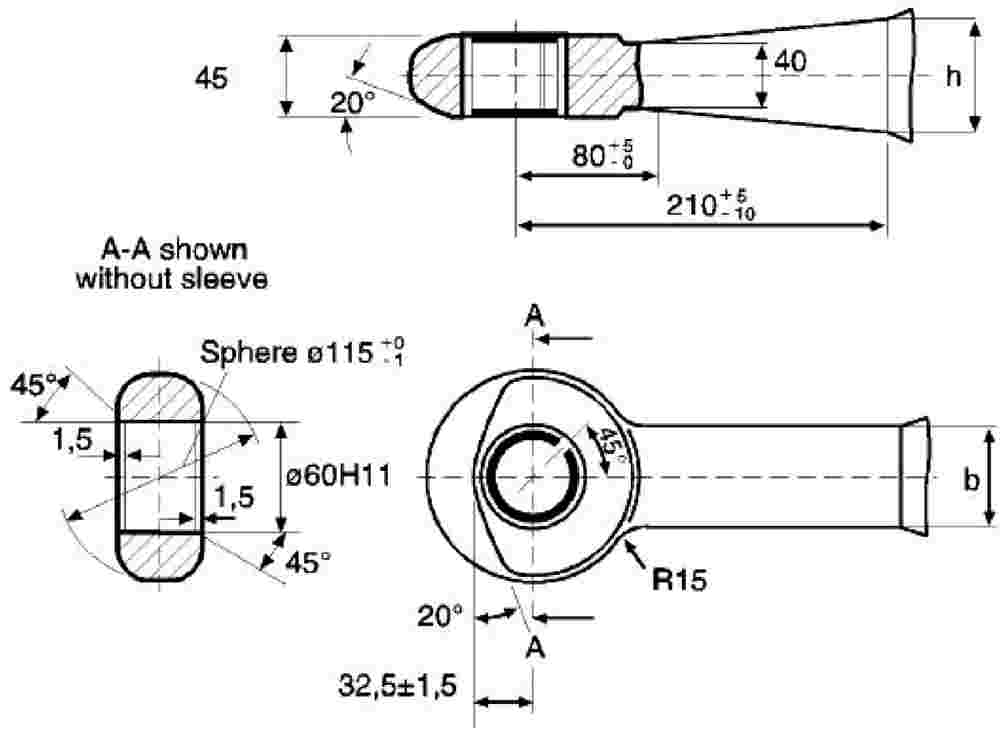
Dimensions for drawbar eyes D50-A and D50-X, see Figure 11
|
Class |
h (mm) |
b (mm) |
|
D50-A |
65 +2/-1 |
60 +2/-1 |
|
D50-X |
80 max. |
62 max. |
Table 7
Characteristic values for standard drawbar eyes
|
Class |
D |
Dc |
S |
V |
|
D50-A |
130 |
90 |
1 000 |
30 |
|
D50-B |
130 |
90 |
1 000 |
25 |
|
D50-C |
190 |
120 |
1 000 |
50 |
|
D50-D |
190 |
130 |
1 000 |
75 |
|
4.2. |
Special requirements for Class D50 drawbar eyes: |
|
4.2.1. |
Class D50-A and D50-X drawbar eyes shall have the dimensions illustrated in Figure 11. |
Figure 11
Dimensions of Classes D50-A and D50-X drawbar eyes,
(see Table 6)
|
4.2.2. |
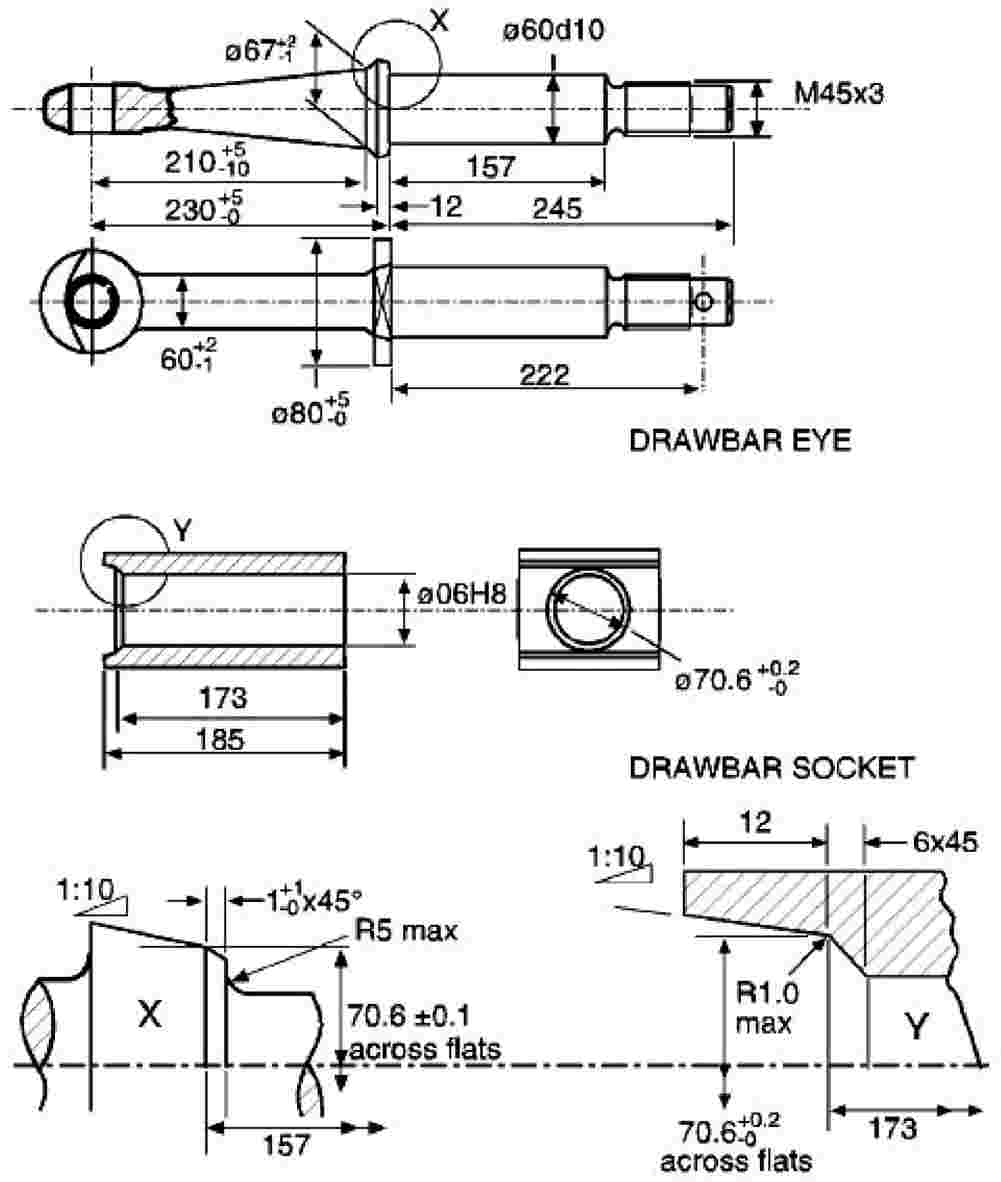
Class D50-B drawbar eyes shall have the dimensions illustrated in Figure 12. |
Figure 12
Dimensions of Class D50-B drawbar eyes,
(see other dimensions in Figure 11)
|
4.2.3. |
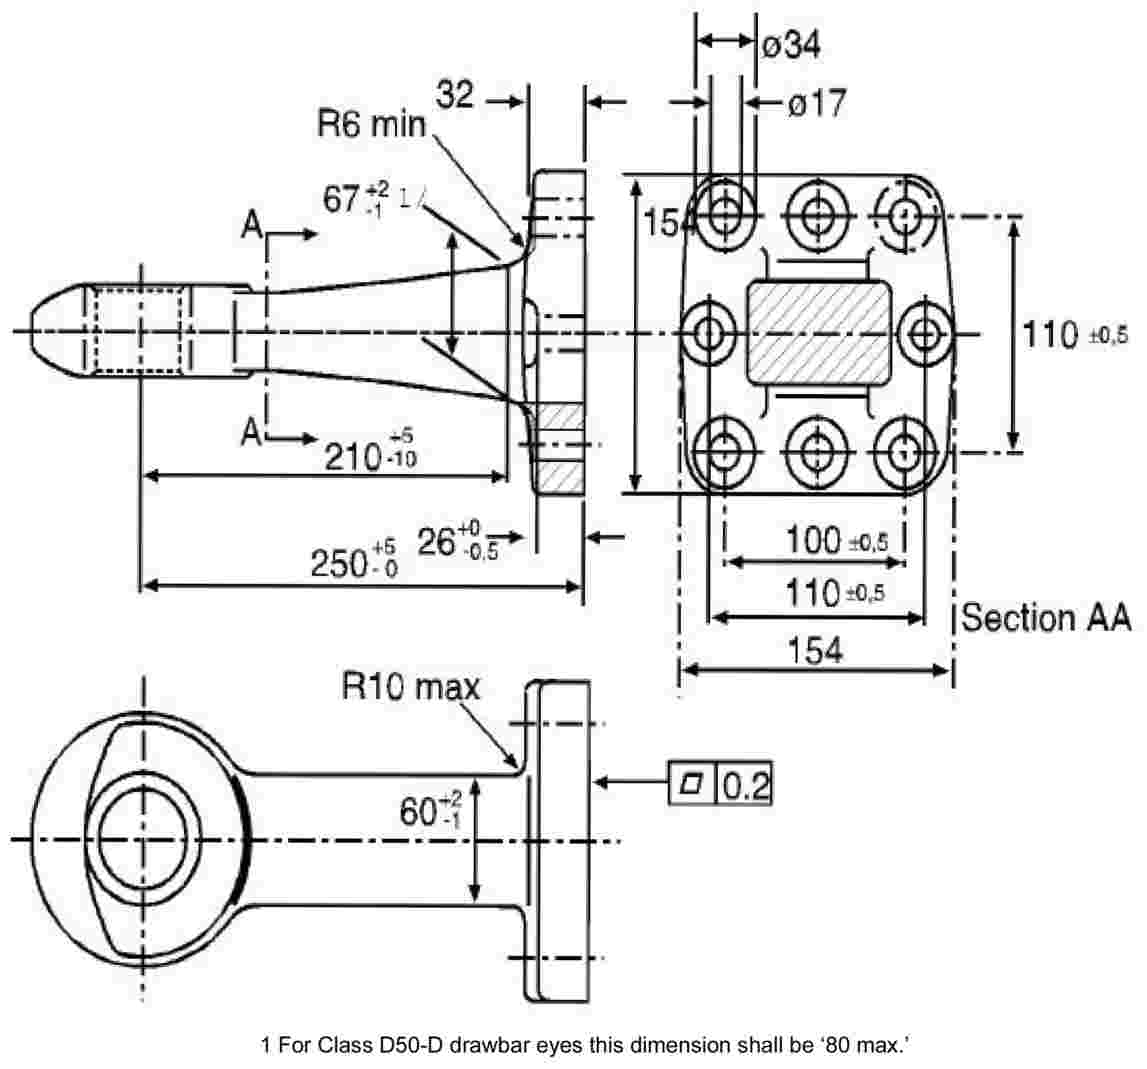
Classes D50-C and D50-D drawbar eyes shall have the dimensions illustrated in Figure 13. |
Figure 13
Dimensions of Classes D50-C and D50-D drawbar eyes,
(see other dimensions in Figure 11)
|
4.2.4. |
Classes D50-C and D50-D drawbar eyes shall be fitted with non slotted sleeves shown in Figure 10. |
|
4.3. |
Load values for standard drawbar eyes. Standard drawbar eyes and the means of attachment shall be suitable for, and tested for, the load values stated in Table 7. |
|
4.4. |
General requirements for Class L toroidal drawbar eyes: |
|
4.4.1. |
Class L toroidal drawbar eyes are intended for use with Class K hook type couplings |
|
4.4.2. |
When used with a Class K hook type coupling they shall meet the requirements for articulation given in paragraph 10.2 of this annex. |
|
4.4.3. |
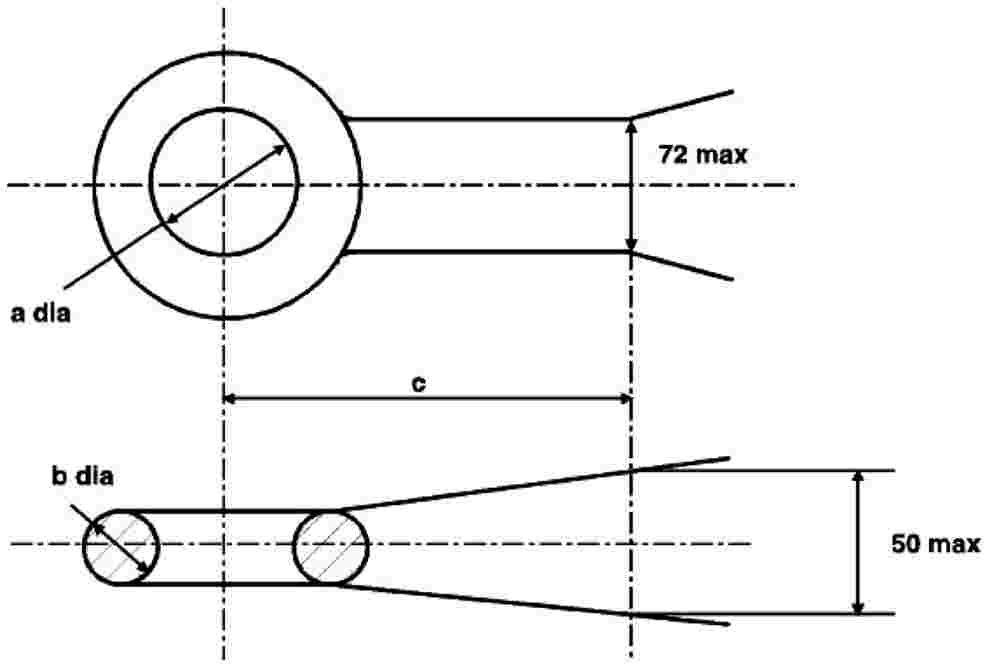
Class L toroidal drawbar eyes shall have the dimensions given in Figure 14 and Table 8 |
Figure 14
Dimensions of Class L toroidal drawbar eyes
(see Table 8)
|
4.4.4. |
Class L toroidal drawbar eyes shall satisfy the tests given in annex 6, paragraph 3.4 and shall be suitable for the characteristic values given in Table 9. Table 8 Dimensions of Class L toroidal drawbar eyes — see Figure 14 (Dimensions in mm)
Table 9 Characteristic values for Class L toroidal drawbar eyes
|
5. DRAWBARS
|
5.1. |
Drawbars of class E shall satisfy the tests prescribed in annex 6, paragraph 3.3. |
|
5.2. |
In order to provide a connection to the towing vehicle, the drawbars can be fitted either with coupling heads as in paragraph 2 or drawbar eyes as in paragraph 4 of this annex. The coupling heads and drawbar eyes can be attached by screwing, bolting or welding. |
|
5.3. |
Height adjusting devices for hinged drawbars. |
|
5.3.1. |
Hinged drawbars shall be fitted with devices for adjusting the drawbar to the height of the coupling device or jaw. These devices shall be designed so that the drawbar can be adjusted by one person without tools or any other aids. |
|
5.3.2. |
Height adjusting devices shall be able to adjust the drawbar eyes or ball couplings from the horizontal above the ground at least 300 mm upwards and downwards. Within this range the drawbar shall be adjustable steplessly, or in maximum steps of 50 mm measured at the drawbar eye or ball coupling. |
|
5.3.3. |
Height adjusting devices shall not interfere with the easy movement of the drawbar after coupling. |
|
5.3.4. |
The height adjusting devices shall not interfere with the action of any inertia, overrun type, brake. |
|
5.4. |
In the case of drawbars combined with inertia, overrun, brakes, the distance between the centre of the drawbar eye and the end of the free shank of the drawbar eye shall not be less than 200 mm in the brake application position. With the shank of the drawbar eye fully inserted the distance shall not be less than 150 mm. |
|
5.5. |
Drawbars for use on centre axle trailers shall possess at least half the moment of resistance against lateral forces as against vertical forces. |
6. DRAWBEAMS
|
6.1. |
Drawbeams of Class F shall satisfy the tests prescribed in annex 6, paragraph 3.3. |
|
6.2. |
The drilling pattern for mounting of Class C standard drawbar couplings shall be in accordance with Figure 15 and Table 10 below. |
|
6.3. |
Drawbeams shall not be welded to the chassis, bodywork or other part of the vehicle. |
Figure 15
Mounting dimensions for standard drawbar couplings
(see Table 10)
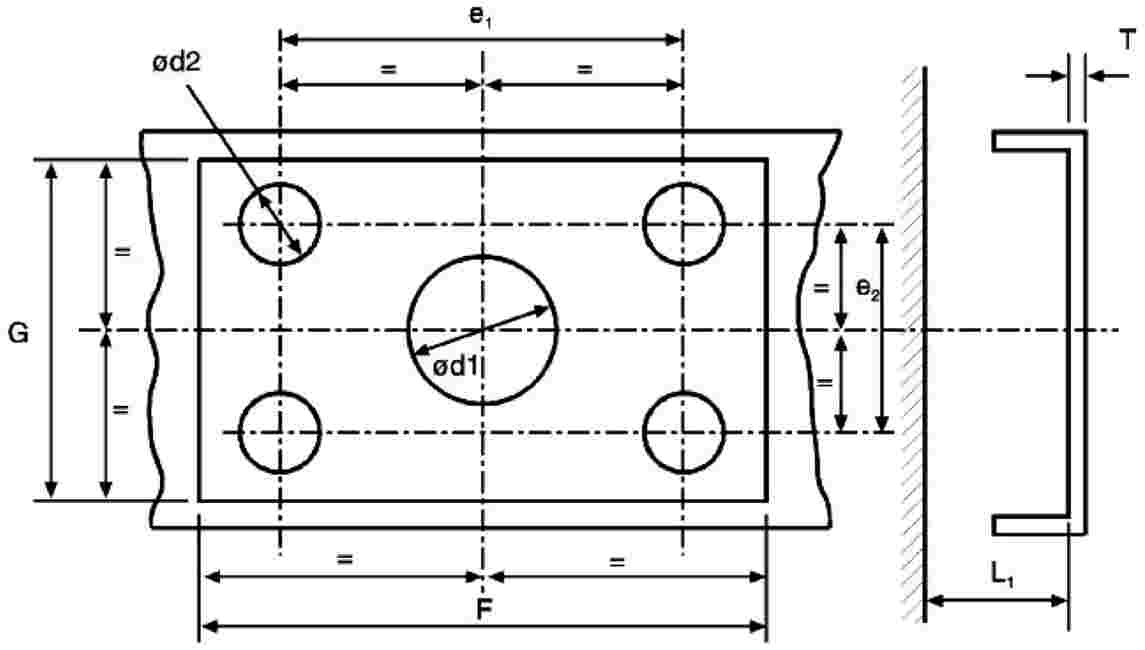
Table 10
Mounting dimensions for standard drawbar couplings (mm) — see Figure 15
|
Class |
C50-1 |
C50-2 |
C50-3 |
C50-4 |
C50-5 |
C50-6, C50-7 |
Remarks |
|
e1 |
83 |
83 |
120 |
140 |
160 |
160 |
±0,5 |
|
e2 |
56 |
56 |
55 |
80 |
100 |
100 |
±0,5 |
|
d1 |
|
55 |
75 |
85 |
95 |
95 |
+1,0/-0,5 |
|
d2 |
10,5 |
10,5 |
15 |
17 |
21 |
21 |
H13 |
|
T |
|
15 |
20 |
35 |
35 |
35 |
max. |
|
F |
120 |
120 |
165 |
190 |
210 |
210 |
min. |
|
G |
195 |
95 |
100 |
130 |
150 |
150 |
min. |
|
L1 |
|
200 |
300 |
400 |
400 |
400 |
min. |
7. FIFTH WHEEL COUPLINGS AND STEERING WEDGES
The requirements of paragraphs 7.1 to 7.7 are applicable to all fifth wheel couplings of Class G50.
Additional requirements which shall be fulfilled by standard coupling devices are given in paragraph 7.9.
Steering wedges shall satisfy the requirements listed in paragraph 7.8.
|
7.1. |
Suitable fifth wheel coupling pins Class G50 fifth wheel couplings shall be designed so that they can be used with Class H50 coupling pins and, together, provide the specified characteristics. |
|
7.2. |
Guides Fifth wheel couplings shall be equipped with a guide which ensures safe and correct engagement of the coupling pin. The entry width of the guide for standard 50 mm diameter fifth wheel couplings shall be at least 350 mm (see Figure 16). For small, non-standard, fifth wheel couplings of Class G50-X and having a maximum “D” value of 25 kN, the entry width shall be at least 250 mm. |
Figure 16
Dimensions of standard fifth wheel couplings
(see Table 11)
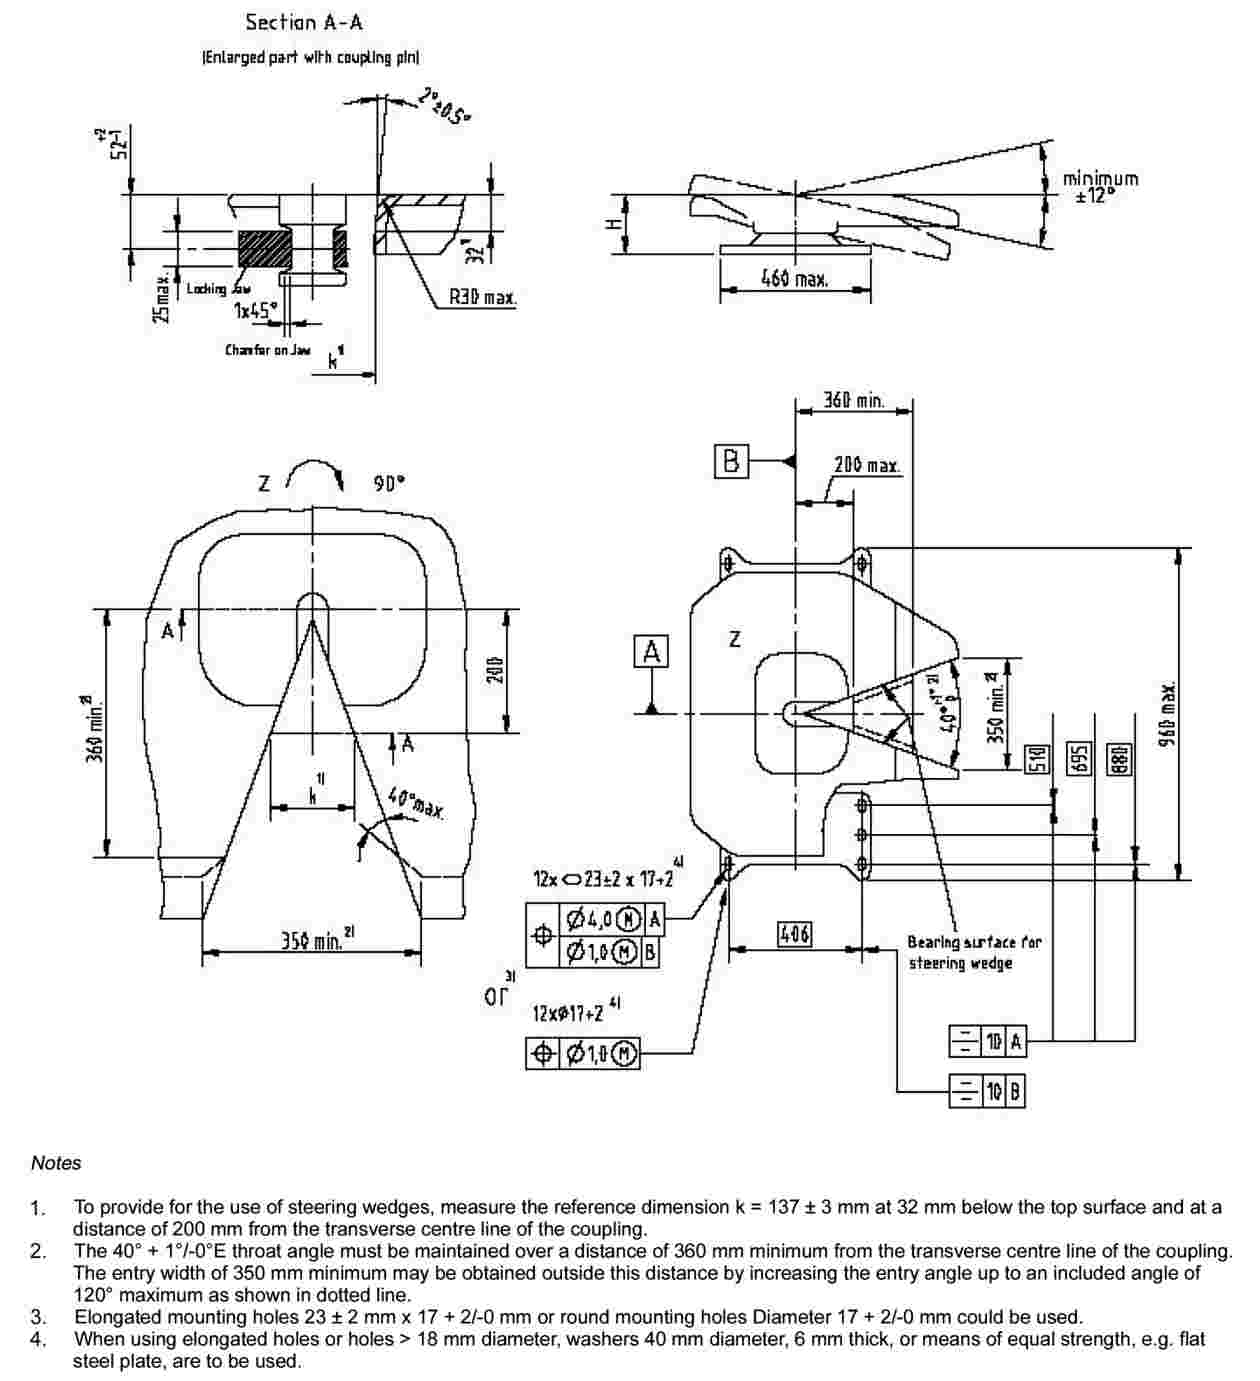
Figure 16a
Mounting holes tolerances for class J mounting plates for fifth wheel couplings
(see para. 9.1. of this annex)
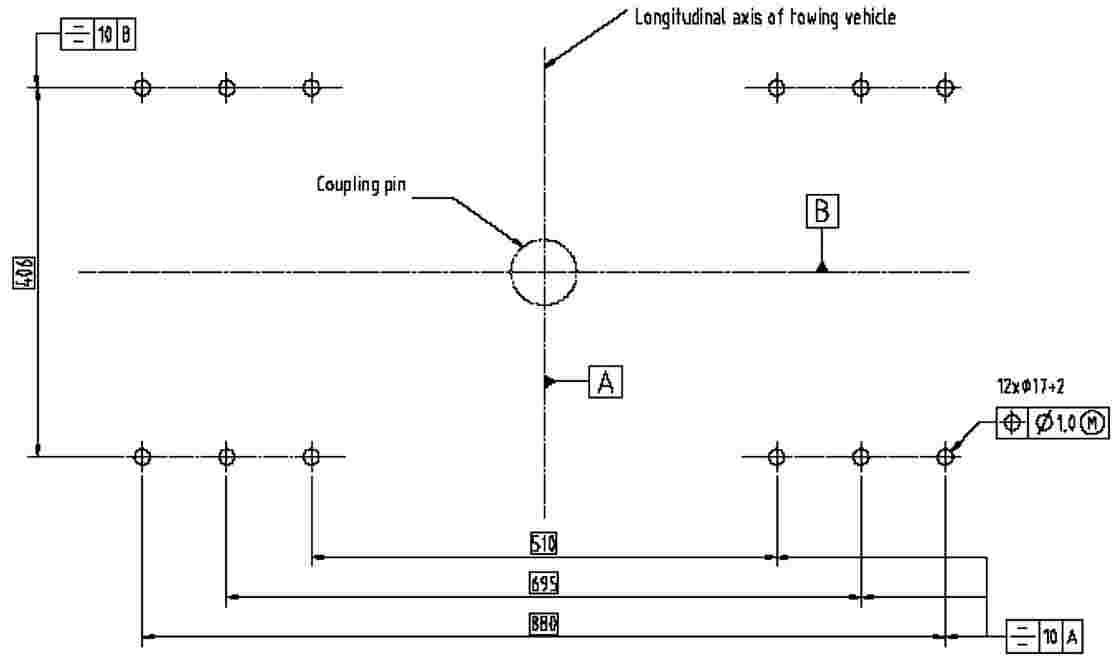
Table 11
Dimensions of standard fifth wheel couplings (mm)
(see Figure 16)
|
Class |
G50-1 |
G50-2 |
G50-3 |
G50-4 |
G50-5 |
G50-6 |
|
H |
140-159 |
160-179 |
180199 |
200-219 |
220-239 |
240-260 |
|
7.3. |
Minimum articulation of the fifth wheel coupling With the coupling pin engaged, without the fifth wheel coupling being attached to a vehicle or mounting plate, but taking into account the effect of the mounting bolts, the coupling shall permit, simultaneously, the following minimum values of articulation of the coupling pin: |
|
7.3.1. |
±90o about the vertical axis (not applicable to fifth wheel couplings with positive steering); |
|
7.3.2. |
±12o about the horizontal axis transverse to the direction of travel. This angle does not necessarily cover off-road use. |
|
7.3.3. |
Axial rotation about the longitudinal axis of up to ±3o is permitted. However, on a fully oscillating fifth wheel coupling, this angle may be exceeded, providing that the locking mechanism enables the restriction of the rotation to ±3o maximum. |
|
7.4. |
Locking devices to prevent uncoupling of fifth wheel couplings The fifth wheel coupling shall be locked in the coupled position by two positive mechanical locking devices each of which shall remain effective should the other fail. The primary locking device shall operate automatically but the secondary locking device may either be automatic or be engaged manually. The secondary locking device may be designed to work in conjunction with the primary device and provide an additional positive mechanical lock for the primary device. It shall only be possible to engage the secondary locking device if the primary device is properly engaged. It shall not be possible for the locking devices to be released inadvertently. Release shall require intentional action by the driver or operator of the vehicle. The closed and locked position of the coupling shall be indicated visually by a mechanical device and it shall be possible to verify the position of the indicator by feel, for example, to allow the position to be checked during darkness. The indication device shall indicate the engagement of both primary and secondary locking devices, however, it is sufficient for the engagement of only one device to be indicated if, in this case, the engagement of the other device is a simultaneous and inherent feature of the design. |
|
7.5. |
Operating devices or release mechanisms In the closed position the operating devices or release mechanisms shall be prevented from being operated inadvertently or accidentally. The locking system shall be such as to require positive, conscious action to release the locking device in order to operate coupling release mechanism. |
|
7.6. |
Surface finish The surfaces of the coupling plate and coupling lock shall be functionally satisfactory and be carefully machined, forged, cast or pressed. |
|
7.7. |
Load requirements All fifth wheel couplings shall be able to satisfy the tests described in annex 6, paragraph 4.7. |
|
7.8. |
Steering wedges |
|
7.8.1. |
The dimensions of steering wedges for the positive steering of semitrailers shall be as in Figure 17. |
Figure 17
Dimensions of spring-mounted steering wedges
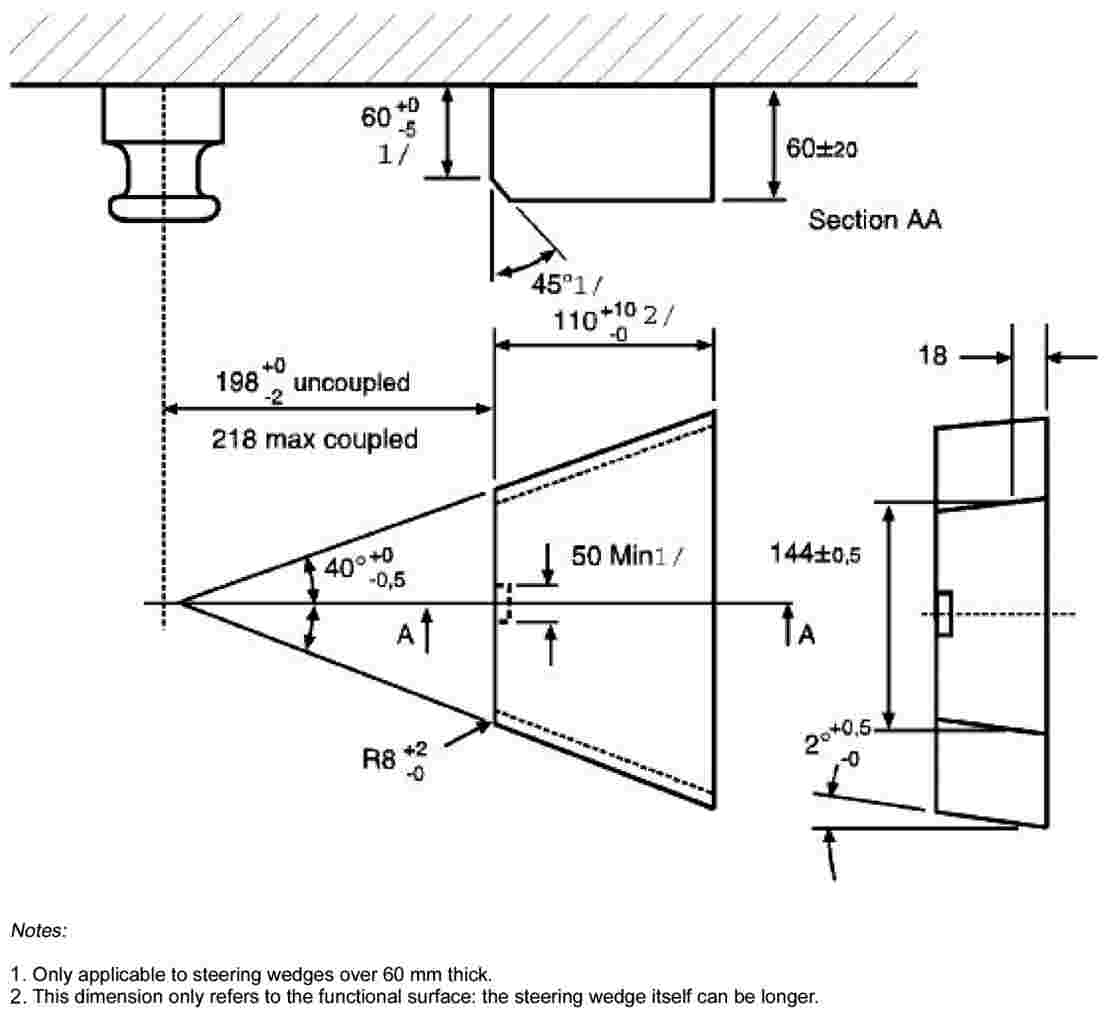
|
7.8.2. |
The steering wedge shall allow safe and correct coupling and shall be spring-mounted. The strength of the spring shall be selected so that it is possible to couple an unloaded semitrailer and so that, with the semitrailer fully loaded the steering wedge is firmly in contact with the flanks of the coupling during use. Uncoupling of the fifth wheel shall be possible with the semitrailer both loaded and unloaded. |
|
7.9. |
Special requirements for standard fifth wheel couplings: |
|
7.9.1. |
the dimensions shall be as shown in Figure 16 and Table 11. |
|
7.9.2. |
they shall be suitable for, and tested for, a D value of 150 kN and a U value of 20 tonnes. |
|
7.9.3. |
release shall be possible by a hand lever mounted directly on the coupling. |
|
7.9.4. |
they shall be suitable for the positive steering of semitrailers by means of steering wedges — see paragraph 7.8. |
8. FIFTH WHEEL COUPLING PINS
|
8.1. |
Fifth wheel coupling pins of Class H50 (ISO 337) shall have the dimensions shown in Figure 18 |
Figure 18
Dimensions of Class H50 fifth wheel coupling pins
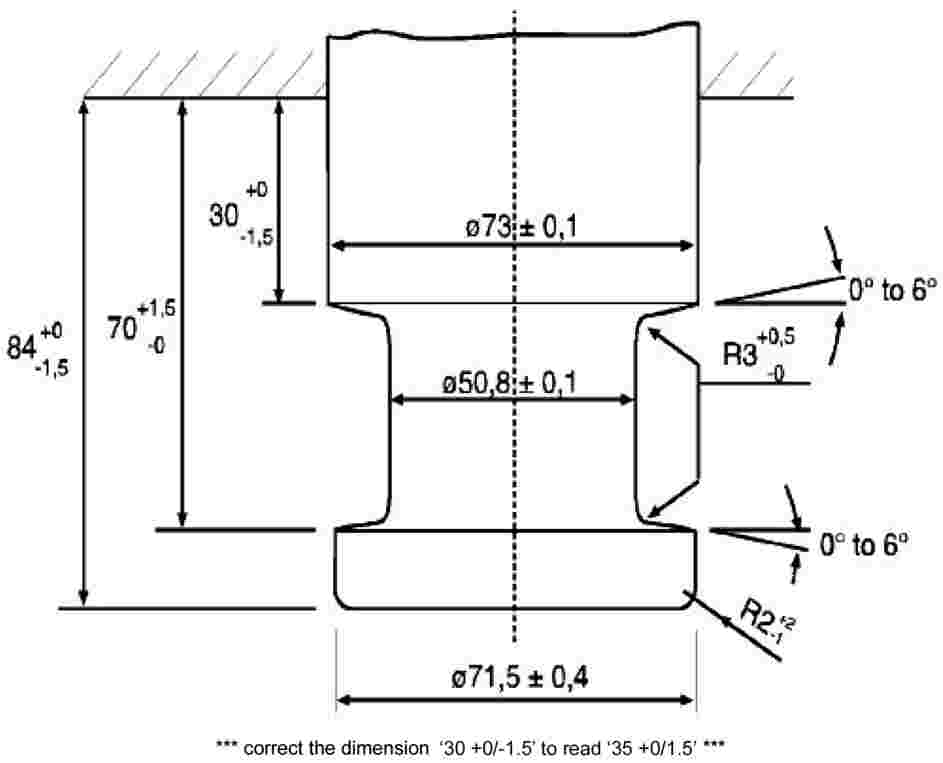
|
8.2. |
The coupling pins shall be able to satisfy the tests described in annex 6, paragraph 3.9. |
9. MOUNTING PLATES
|
9.1. |
Class J mounting plates for fifth wheel couplings shall have circular mounting holes positioned as shown in Figure 16a if they are intended for standard fifth wheel couplings. However, the mounting holes shall be 17 mm + 2,0 mm/-0,0 mm diameter. The holes shall be circular, NOT slotted (see Figure 16a). |
|
9.2. |
Mounting plates for standard fifth wheel couplings shall be suitable for the positive steering of semitrailers (with steering wedges). Mounting plates for non-standard fifth wheel couplings which are unsuitable for positive steering shall be marked appropriately. |
|
9.3. |
Mounting plates for fifth wheel couplings shall be able to satisfy the tests described in annex 6, paragraph 3.8. |
10. HOOK TYPE COUPLINGS
|
10.1. |
General requirements for Class K hook type couplings: |
|
10.1.1. |
All Class K hook type couplings shall satisfy the tests given in annex 6, paragraph 3.5 and shall be suitable for the characteristic values given in Table 13 |
|
10.1.2. |
Class K hook type couplings shall have the dimensions given in Figure 19 and Table 12. Class K1 to K4 are non-automatic couplings for use only on trailers not exceeding 3,5 tonnes maximum permissible mass and Class KA1 to KA3 are automatic couplings. |
Figure 19
Dimensions and articulation of Class K hook type couplings
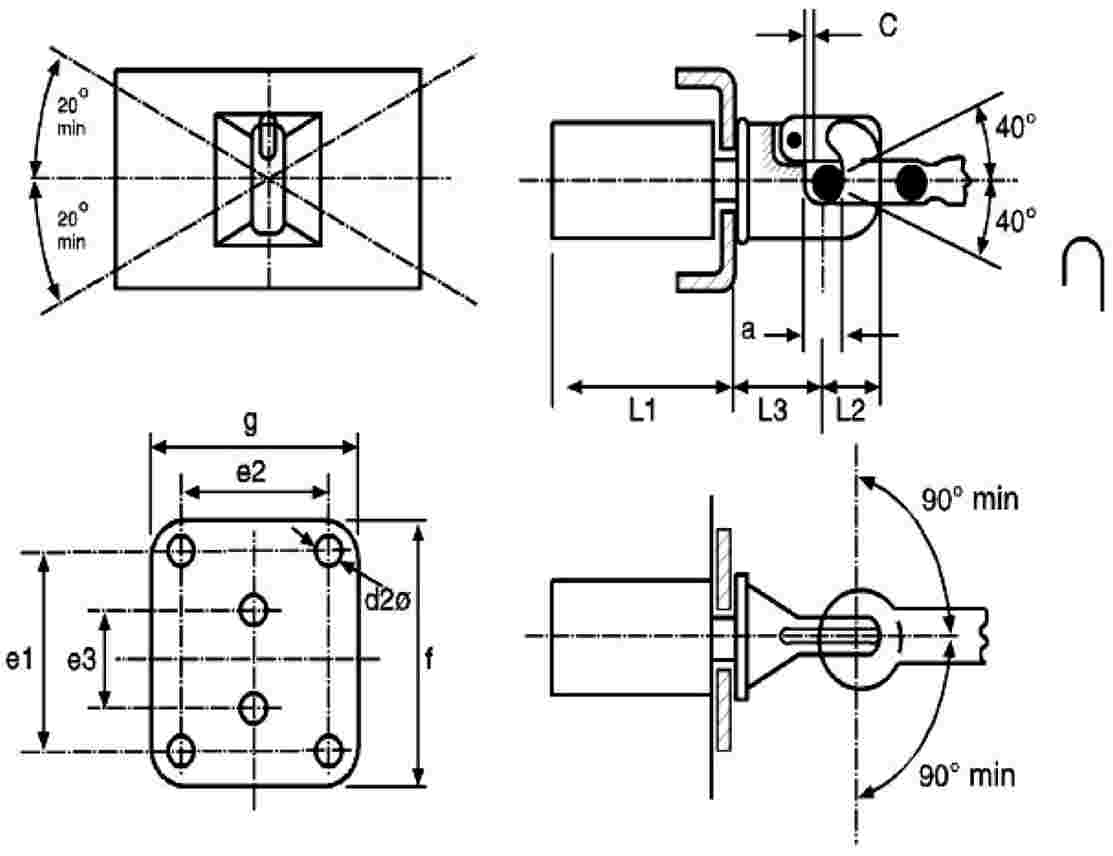
|
10.1.3. |
A hook type coupling shall only be used with a toroidal drawbar eye and when used with a Class L toroidal drawbar eye the Class K coupling shall have the degrees of articulation given in paragraph 10.2 of this annex. |
|
10.1.4. |
A Class K hook type coupling shall be used with a toroidal eye giving a minimum clearance, or free movement, of 3 mm and a maximum clearance of 5 mm when new. Suitable drawbar eyes shall be declared by the coupling manufacturer on the Communication form shown in annex 1. |
|
10.2. |
A Class K coupling when used with a Class L toroidal eye, but not fitted to a vehicle, shall have the following non-simultaneous angles of articulation — see also Figure 19: |
|
10.2.1. |
±90o horizontally about the vertical axis of the coupling; |
|
10.2.2. |
±40o vertically about the horizontal transverse axis of the coupling; |
|
10.2.3. |
±20o axial rotation about the horizontal longitudinal centre line of the coupling. |
|
10.3. |
Automatic Class K hook type couplings shall have a jaw designed such that the drawbar eye is guided into the coupling. |
|
10.4. |
Locking to prevent inadvertent uncoupling: In the closed position the coupling shall be locked by two positive mechanical engagement locking devices each of which shall remain effective should the other fail. The closed and locked position of the coupling shall be clearly indicated externally by a mechanical device. It shall be possible to verify the position of the indicator by feel, for example, in the dark. The mechanical indication device shall indicate the engagement of both locking devices (an AND condition). However, it is sufficient for the engagement of only one locking device to be indicated if, in this situation, engagement of the second locking device is an inherent feature of the design. |
|
10.5. |
Hand levers Hand levers shall be of a design suitable for easy use with the end rounded off. The coupling shall not have any sharp edges or points of possible pinching near the hand lever which could result in injury during operation of the coupling. The force needed to release the coupling, measured without the drawbar eye, shall not exceed 250 N perpendicular to the hand lever along the line of operation. Table 12 Dimensions for Class K hook type couplings — see Figure 19
Table 13 Characteristic values for Class K hook type couplings
|
11. DEDICATED DRAWBAR TYPE COUPLINGS — CLASS T
|
11.1. |
Class T dedicated drawbar type couplings are intended for use on specific vehicle combinations, for example, car transporters. These vehicles have special structures and may need particular and unusual location of the coupling. |
|
11.2. |
Class T couplings shall be restricted to use with centre axle trailers and this restriction shall be notified on the Communication form shown in annex 1. |
|
11.3. |
Class T couplings shall be approved as a matched pair and it shall not be possible to separate the coupling other than in a workshop using tools which are not normally carried on the vehicle. |
|
11.4. |
Class T couplings shall not be automatic in operation. |
|
11.5. |
Class T couplings shall satisfy the relevant test requirements given in annex 6, paragraph 3.3., except paragraph 3.3.4. |
|
11.6. |
The following minimum and simultaneous angles of articulation shall be possible with the coupling not fitted to a vehicle but assembled, and in the same normal position as when fitted to a vehicle; |
|
11.6.1. |
±90o horizontally about the vertical axis; |
|
11.6.2. |
±8o vertically about the horizontal transverse axis; |
|
11.6.3. |
±3o axial rotation about the horizontal longitudinal axis. |
12. DEVICES FOR REMOTE INDICATION AND REMOTE CONTROL
|
12.1. |
General requirements Devices for remote indication and remote control are permitted only on automatic coupling devices of Classes C50-X and G50-X. Devices for remote indication and remote control shall not interfere with the minimum free movement of the coupled drawbar eye or coupled semitrailer. They shall be permanently fitted to the vehicle. All the devices for remote indication or remote control fall within the scope of testing and approval of the coupling device together with all parts of the operating devices and transmission devices. |
|
12.2. |
Remote indication |
|
12.2.1. |
For an automatic coupling procedure, remote indication devices shall indicate the closed and doubly locked position of the coupling in an optical manner according to paragraph 12.2.2. Additionally the open position may be indicated as in paragraph 12.2.3. The remote indication device shall be automatically activated and reset during every opening and closing of the coupling. |
|
12.2.2. |
The change from the open to the closed and doubly locked position shall be indicated by a green optical signal. |
|
12.2.3. |
If the open and/or unlocked position is indicated, a red optical signal shall be used. |
|
12.2.4. |
In the case of indicating the completion of the automatic coupling procedure, the remote indicator shall ensure that the coupling pin has reached the doubly locked end position. |
|
12.2.5. |
The appearance of any fault in the remote indication system shall not indicate a closed and locked position during the coupling procedure if the end position has not been reached. |
|
12.2.6. |
The disengagement of one of the two locking devices shall cause the green optical signal to extinguish and the red optical signal (if fitted) to show. |
|
12.2.7. |
The mechanical indicators fitted directly to the coupling device shall be retained. |
|
12.2.8. |
In order to avoid distracting the driver during normal driving, there shall be a provision for switching off the remote indication device but this shall be automatically reactivated when the coupling is next opened and closed — see paragraph 12.2.1. |
|
12.2.9. |
The operating controls and indicators of the remote indication devices shall be mounted within the driver's field of vision and be permanently and clearly identified. |
|
12.3. |
Remote control |
|
12.3.1. |
If a remote control device, as defined in paragraph 2.8 of this Regulation, is employed, there shall also be a remote indication device as described in paragraph 12.2 which shall at least indicate the open condition of the coupling. |
|
12.3.2. |
There shall be a dedicated switch (i.e. master switch, lever or valve) to enable the coupling to be opened or closed by means of the remote control device. If this master switch is not located in the driving cab it shall not be in a position where it is freely accessible to unauthorised persons or it shall be lockable. The actual operation of the coupling from the driving cab may only be possible when inadvertent operation has been precluded, for example by an operation requiring the use of two hands. It shall be possible to ascertain whether opening of the coupling under remote control has been completed or not. |
|
12.3.3. |
If remote control involves the coupling being opened by external force, the condition under which the external force acts on the coupling shall be indicated appropriately to the driver. This is not necessary if the external force is only operative while the remote control is operating. |
|
12.3.4. |
If the actuating device for opening the coupling under remote control is mounted externally on the vehicle it shall be possible to oversee the area between the coupled vehicles, but it shall not be necessary, however, to enter this area in order to operate it. |
|
12.3.5. |
Any single error in operation or the occurrence of any single fault in the system shall not result in accidental opening of the coupling during normal road use. Any faults in the system shall be indicated directly or be immediately obvious at the next operation e.g. by a malfunction. |
|
12.3.6. |
In the event of a failure of the remote control it shall be possible, in an emergency, to open the coupling in at least one other way. If this requires the use of a tool then this shall be included in vehicle's tool kit. The requirements of paragraph 3.6 of this annex are not applicable to hand levers used exclusively for opening the coupling in an emergency. |
|
12.3.7. |
The operating controls and indicators for the remote control devices shall be permanently and clearly identified. |
ANNEX 6
TESTING OF MECHANICAL COUPLING DEVICES OR COMPONENTS
1. GENERAL TESTING REQUIREMENTS
|
1.1. |
Samples of coupling devices shall be tested for both strength and function. Physical testing shall be carried out wherever possible but unless stated otherwise the type approval authority or technical service may waive a physical strength test if the simple design of a component makes a theoretical check possible. Theoretical checks may be carried out to determine worst case conditions. In all cases, theoretical checks shall ensure the same quality of results as with dynamic or static testing. In cases of doubt it is the results of physical testing that are overriding. See also paragraph 4.8 of this Regulation. |
|
1.2. |
With coupling devices the strength shall be verified by a dynamic test (endurance test). In certain cases additional static tests may be necessary (see paragraph 3 of this annex). |
|
1.3. |
The dynamic test shall be performed with approximately sinusoidal load (alternating and/or pulsating) with a number of stress cycles appropriate to the material. No cracks or fractures shall occur. |
|
1.4. |
Only slight permanent deformation is permitted with the static tests prescribed. Unless stated otherwise the permanent, plastic, deformation after releasing shall not be more than 10 % of the maximum deformation measured during the test. In the case where measurement of deformation during the test puts the tester at risk then, provided that the same parameter is checked during other tests, such as the dynamic test, then this part of the static test may be omitted. |
|
1.5. |
The loading assumptions in the dynamic tests are based on the horizontal force component in the longitudinal axis of the vehicle and the vertical force component. Horizontal force components transverse to the longitudinal axis of the vehicle, and moments, are not taken into account provided they are of only minor significance. If the design of the coupling device or its attachment to the vehicle or the attachment of additional systems (such as stabilisers, close coupling devices, etc.) generate additional forces or moments, additional tests may be required by the type approval authority or technical service. The horizontal force component in the longitudinal axis of the vehicle is represented by a theoretically determined reference force, the D or Dc value. The vertical force component, where applicable, is represented by the static vertical bearing load, S, at the point of coupling and the assumed vertical load, V, or by the static vertical bearing load, U, in the case of fifth wheel couplings. |
|
1.6. |
The characteristic values D, Dc, S, V and U, on which the tests are based and which are defined in paragraph 2.11. of this Regulation, shall be taken from the manufacturer's information given in the application for type approval — see communication form shown in annexes 1 and 2. |
|
1.7. |
Any positive locking device, which is retained in position by spring force, shall remain in its secured position when subjected to a force applied in the least favourable direction and equivalent to three times the mass of the locking mechanism. |
2. TEST PROCEDURES
|
2.1. |
For the dynamic tests and static tests, the sample shall be placed in a suitable rig with a means of force application, such that it is not subjected to any additional forces or moments apart from the specified test force. In the case of alternating tests, the direction of force application shall not deviate by more than ±1o from the specified direction. In the case of pulsating and static tests, the angle shall be set for the maximum test force. This will normally require a joint at the point of force application (i.e. the point of coupling) and a second joint an adequate distance away. |
|
2.2. |
The test frequency shall not exceed 35 Hz. The selected frequency shall be well separated from resonance frequencies of the test set up including the tested device. With asynchronous testing the frequencies of the two force components shall be between approximately 1 per cent and a maximum of 3 per cent apart. For coupling devices made from steel the number of stress cycles is 2 × 10⁶. For devices made from materials other than steel a higher number of cycles may be necessary. The dye‐penetration method of crack testing or an equivalent method shall be used to determine any cracking during test. |
|
2.3. |
With pulsating tests, the test force varies between the maximum test force and a lower, minimum, test force, which may not be greater than 5 per cent of the maximum test force unless otherwise stated in the specific testing procedure. |
|
2.4. |
With static tests, other than the special tests required by paragraph 3.2.3 of this annex, the test force shall be applied smoothly and quickly and be maintained for at least 60 seconds. |
|
2.5. |
The coupling devices or component on test should normally be mounted as rigidly as possible on a test rig in the actual position in which they will be used on the vehicle. The fixing devices should be those specified by the manufacturer or applicant and should be those intended for the attachment of the coupling device or component to the vehicle and/or shall have identical mechanical characteristics. |
|
2.6. |
Coupling devices or components shall be tested in the form used on the road. However, at the discretion of the manufacturer, and in agreement with the technical service, flexible components may be neutralised if this is necessary for the test procedure and if this will not have any unrealistic influence on the test result. Flexible components which are overheated during these accelerated test procedures may be replaced during the test. The test loads may be applied by means of special slack‐free devices. |
3. SPECIFIC TESTING REQUIREMENTS
|
3.1. |
Coupling balls and towing brackets |
|
3.1.1. |
Mechanical coupling devices with coupling balls may be of the following types:
|
Figure 20
Arrangements of ball type towing brackets
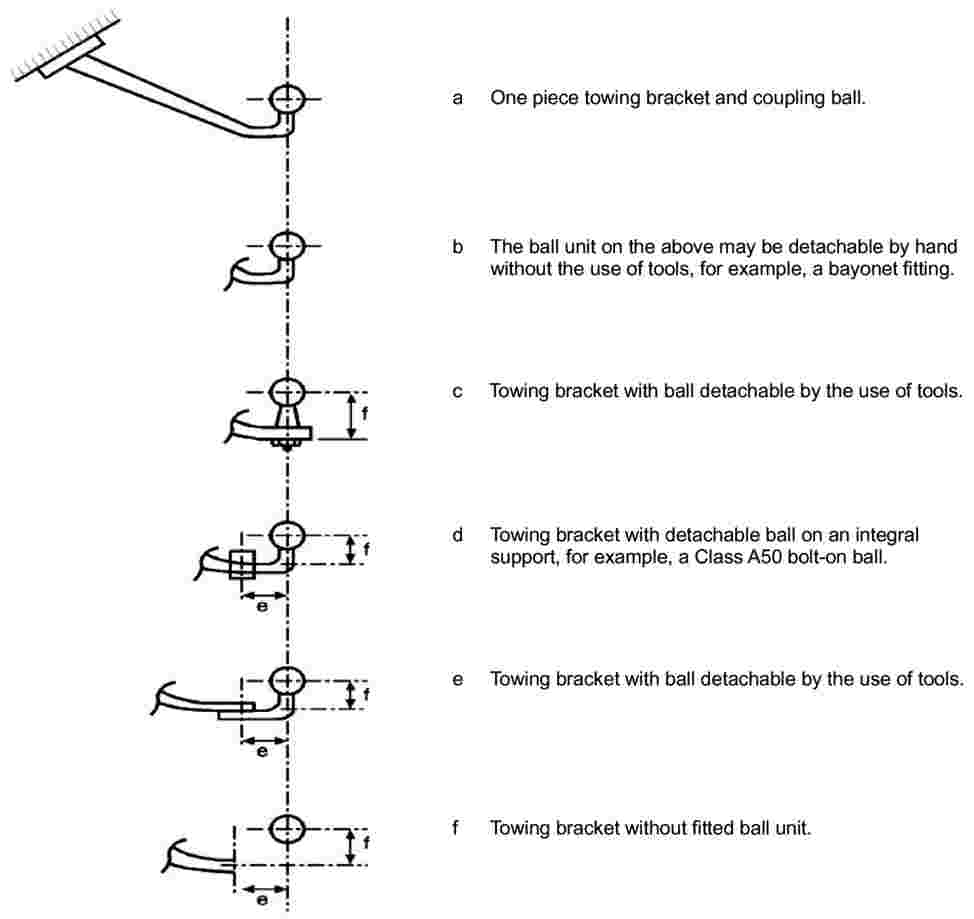
|
3.1.2. |
The basic test is a dynamic endurance test. The test sample comprises the coupling ball, the ball neck and the mountings necessary for attaching the assembly to the vehicle. The coupling ball and towing bracket shall be rigidly mounted to a test rig, capable of producing an alternating force, in the actual position in which it is intended for use. |
|
3.1.3. |
The positions of the fixing points for attaching the coupling ball and towing bracket are specified by the vehicle manufacturer (see paragraph 5.3.2 of this Regulation). |
|
3.1.4. |
The devices submitted for test shall be provided with all parts and design details which may have an influence on the strength criteria (for example electrical socket plate, any marking, etc.). The test sample shall include all parts up to the anchorage points or fitting points to the vehicle. The geometric location of the coupling ball and the fixing points of the coupling device related to the reference line shall be provided by the vehicle manufacturer and shall be shown in the test report. All relative positions of the anchorage points with respect to the reference line, for which the towing vehicle manufacturer shall provide all the necessary information to the towing device manufacturer, shall be repeated on the test bed. |
|
3.1.5. |
The sample mounted on the test rig shall be subjected to an alternating stress test applied at an angle to the ball as shown in Figure 21 or 22. The direction of the angle of test shall be determined by the vertical relationship between a horizontal reference line passing through the centre of the ball and a horizontal line passing through the fixing point of the coupling device which is the highest of the nearest, when measured in a horizontal plane, to a transverse vertical plane passing through the centre of the ball. If the fixing point line is above the horizontal reference line, the test shall be carried out at an angle of α = + 15o ±1o and if it is below then the test shall be carried out at an angle of α = -15o ±1o (see Figure 21). The fixing points to be considered in determining the angle of test shall be those declared by the vehicle manufacturer and which transmit the major towing forces to the structure of the towing vehicle. This angle is chosen in order to take account of the vertical static and dynamic load and is only applicable for a permitted static vertical load not exceeding: S = 120 × D [N] Where the static vertical load exceeds that calculated above, the angle shall, in both conditions, be increased to 20o. The dynamic test shall be performed with the following test force: Fhs res = ±0.6 D |
|
3.1.6. |
The test procedure is applicable to the different types of coupling devices (see paragraph 3.1.1 of this annex) as follows: |
|
3.1.6.1. |
one piece coupling balls including devices with non‐interchangeable detachable balls (see Figures 20a and 20b). |
|
3.1.6.1.1. |
the strength test for the devices shown in Figures 20a and 20b shall be carried out according to the requirements of paragraph 3.1.5; |
Figure 21
Angles of application of test force
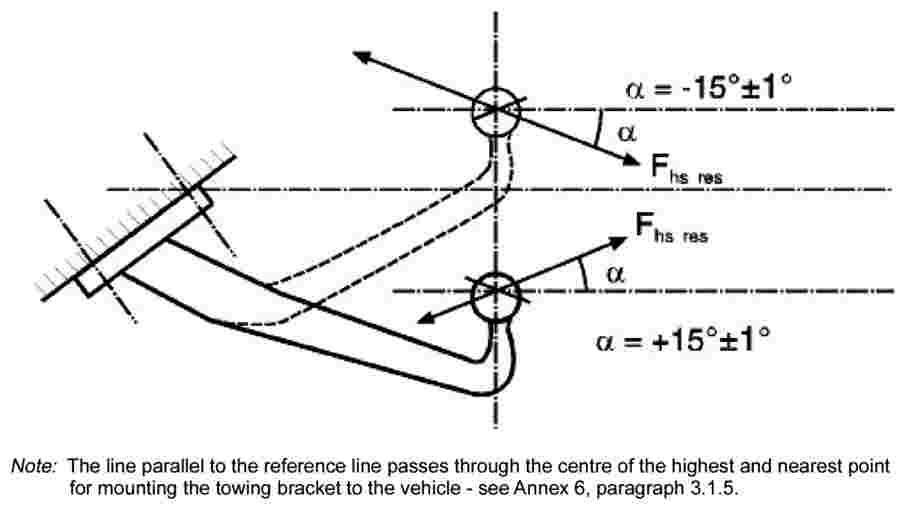
Figure 22
Angles of application of test force
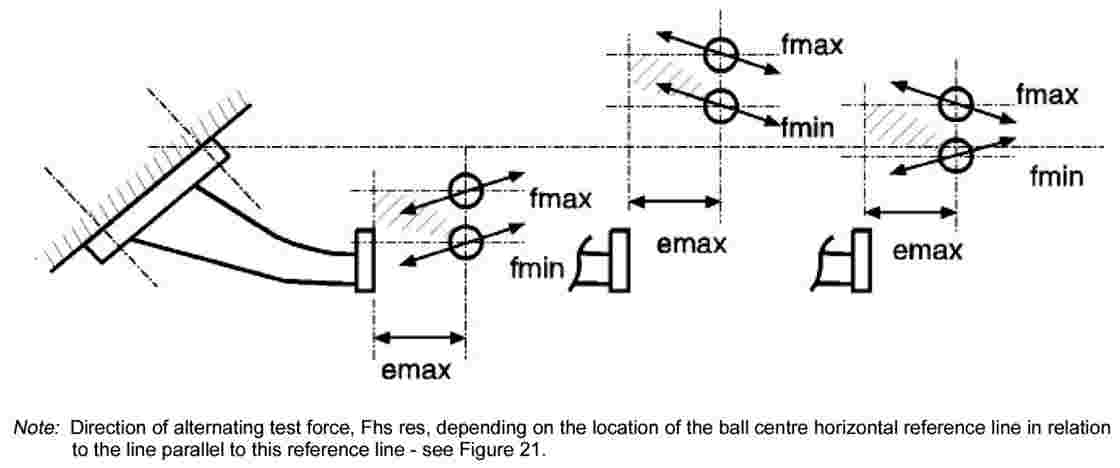
|
3.1.6.2. |
coupling balls, comprising parts which can be dismantled. The following categories are defined:
|
|
3.1.6.2.1. |
The strength test for the devices shown in Figures 20c to 20f shall be carried out according to the requirements of paragraph 3.1.5. Dimensions e and f, shall have a manufacturing tolerance of ±5 mm, and shall be stated in the test report. The test of the towing bracket (see Figure 20f) shall be carried out with a mounted ball (on support). Account will be taken only of the result of the test on the towing bracket between the fixing points and the mounting surface of the ball support. The dimensions e and f shall have a manufacturing tolerance of ±5 mm and shall be specified by the coupling device manufacturer. |
|
3.1.6.3. |
Coupling devices with variable dimensions e and f for demountable and interchangeable coupling balls — see Figure 22. |
|
3.1.6.3.1. |
The strength tests for such towing brackets shall be carried out to the requirements of paragraph 3.1.5. |
|
3.1.6.3.2. |
If a worst case configuration can be defined by agreement between the manufacturer and the type approval authority or technical service, then testing of this one configuration alone shall be sufficient. Otherwise, several ball positions shall be tested in a simplified test programme according to paragraph 3.1.6.3.3. |
|
3.1.6.3.3. |
In a simplified test programme, the value for f shall be between a defined value of fmin and a value of fmax which does not exceed 100 mm. The ball shall be at a distance, emax, of 130 mm from the support. To cover all possible positions of the ball, in the field given by the horizontal distance from the mounting surface and the vertical range of f (fmin to fmax), two devices are to be tested:
The angle of application of the test force will vary, positive or negative, depending on the relationship of the ball centre horizontal reference line to the parallel line passing through the highest and nearest coupling device fixing point. The angles to be used are shown in Figure 22. |
|
3.1.7. |
In the case where detachable ball units are retained using fixing arrangements other than screwed fittings, for example, spring clips, and where the positive mechanical engagement aspect of the arrangement is not tested during the dynamic test, then the arrangement shall be subject to a static test applied to the ball or to the positive mechanical engagement arrangement in an appropriate direction. Where the positive mechanical engagement arrangement retains the ball unit vertically, the static test shall be to apply an upwards vertical force to the ball equivalent to the “D” value. Where the positive mechanical engagement arrangement retains the ball unit by means of a transverse horizontal design, the static test shall be to apply a force in this direction equivalent to 0,25 D. There shall not be any failure of the positive mechanical engagement device or any distortion likely to have an adverse effect on its function. |
|
3.1.8. |
The attachment points for the secondary coupling referred to in annex 5, paragraph 1.5 shall withstand a horizontal static force equivalent to 2D with a maximum of 15 kN. Where there is a separate attachment point for a breakaway cable this shall withstand a horizontal static force equivalent to D. |
|
3.2. |
Coupling heads |
|
3.2.1. |
The basic test is an endurance test using an alternating test force followed by a static test (lifting test) on the same test sample. |
|
3.2.2. |
The dynamic test shall be performed with a Class A coupling ball of appropriate strength. On the test rig the coupling ball and coupling head shall be arranged as instructed by the manufacturer and orientated in a way corresponding to the relative positions in normal use. There should be no possibility of extra forces in addition to the test force acting on the specimen. The test force shall be applied along a line passing through the centre of the ball and inclined downwards to the rear at 15o (see Figure 23). An endurance test must be performed on a test specimen with the following test force: Fhs res w = ±0,6 D Where the maximum permissible static vertical mass, S, exceeds 120 D, then the angle of test shall be increased to 20o. |
Figure 23
Dynamic test
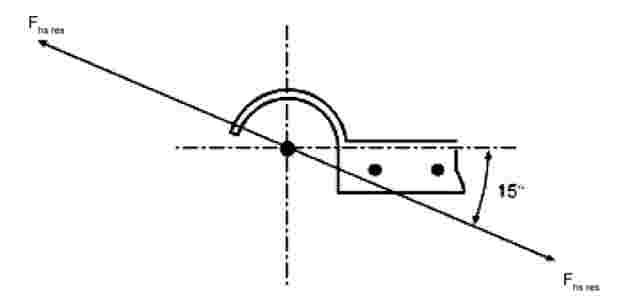
|
3.2.3. |
A static separation test shall also be performed. The coupling ball used for the test shall have a diameter of 49,00 to 49,13 mm in order to represent a worn coupling ball. The separation force, Fa, shall be applied perpendicular to both the transverse and longitudinal centre line axes of the coupling head and shall be increased smoothly and quickly to a value of: Fa = g(C+ S/1 000)kN and be held for 10 seconds. The coupling head shall not separate from the ball nor shall any component of the coupling head exhibit any permanent distortion which could have an adverse effect on its functional capability. |
|
3.3. |
Drawbar couplings and drawbeams |
|
3.3.1. |
An endurance test shall be performed on a test sample. The coupling device shall be equipped with all the fixings needed to attach it to the vehicle. Any intermediate devices fitted between the drawbar couplings and the vehicle frame (i.e. drawbeams) shall be tested with the same forces as the coupling. When testing drawbeams intended for standard drawbar couplings, the vertical load shall be applied at a longitudinal distance from the vertical plane of the fixing points that is equal to the position of the corresponding standard coupling. |
|
3.3.2. |
Drawbar couplings for hinged drawbars (S=0) The dynamic test shall be performed with a horizontal alternating force of Fhw = ±0,6 D acting in a line parallel to the ground and in the longitudinal median plane of the towing vehicle passing through the centre of the coupling pin. |
|
3.3.3. |
Drawbar couplings for use with centre‐axle trailers (S>0). |
|
3.3.3.1. |
Centre axle trailer masses up to and including 3,5 tonnes: Drawbar couplings for use with centre axle trailers up to and including a mass of 3,5 tonnes shall be tested in the same way as coupling balls and towing brackets described in 3.1 of this annex. |
|
3.3.3.2. |
Centre axle trailer masses exceeding 3,5 tonnes: The test forces are applied to the specimen in both horizontal and vertical directions in an asynchronous endurance test. The horizontal line of action shall be equivalent to being parallel to the ground and along the longitudinal median plane of the towing vehicle and pass through the centre of the coupling pin. The vertical line of action shall be perpendicular to the horizontal line of action and shall act along the longitudinal centre line of the coupling pin. The fixing arrangements for the drawbar coupling and the drawbar eye on the test rig shall be those intended for its attachment to the vehicle in accordance with the manufacturer's fitting instructions. The following test forces shall be applied: Table 14 Test forces
The vertical and the horizontal components shall be sinusoidal in shape and shall be applied asynchronously, where the difference of their frequencies shall be between 1 per cent and 3 per cent. |
|||||||||||||
|
3.3.4. |
Static test on coupling pin locking device With drawbar couplings it is also necessary to test the closure and any locking devices by means of a static force of 0,25 D acting in the direction of opening. The test shall not cause the closure to open and it shall not cause any damage. A test force of 0,1 D is sufficient in the case of cylindrical coupling pins. |
|
3.4. |
Drawbar eyes |
|
3.4.1. |
Drawbar eyes shall be subjected to the same dynamic testing as drawbar couplings. Drawbar eyes used solely for trailers having hinged drawbars allowing free vertical movement shall be subjected to an alternating force as described in paragraph 3.3.2. Drawbar eyes also intended for use on centre axle trailers shall be tested in the same way as ball coupling heads (paragraph 3.2) for trailer masses C up to and including 3,5 tonnes and in the same way as drawbar couplings (paragraph 3.3.3.2.) for centre axle trailers with a mass, C, exceeding 3,5 tonnes. |
|
3.4.2. |
Toroidal eyes of Class L shall be tested in the same manner as standard drawbar eyes. |
|
3.4.3. |
The testing of drawbar eyes shall be conducted in such a manner that the alternating force also acts on the parts used for attaching the drawbar eye to the drawbar. All flexible intermediate components shall be clamped. |
|
3.5. |
Hook type couplings |
|
3.5.1. |
Class K hook type couplings shall satisfy the dynamic test given in paragraph 3.5.2 of this annex. |
|
3.5.2. |
Dynamic test: |
|
3.5.2.1. |
The dynamic test shall be a pulsating test using a Class L toroidal eye and with the coupling mounted as it would be on a vehicle and with all of the necessary parts for vehicle installation. However, any flexible components may be neutralised with the agreement of the type approval authority or technical service; |
|
3.5.2.2. |
For hook type couplings intended for use with hinged drawbar trailers, where the imposed vertical load on the coupling, S, is zero, the test force shall be applied in a horizontal direction simulating a tensile force on the hook and varying between 0,05 D and 1,00 D; |
|
3.5.2.3. |
For hook type couplings intended for use with centre axle trailers the test force shall represent the resultant of the horizontal and vertical forces on the coupling and shall be applied along an angle, -α, that is, from top front to bottom rear (see Figure 21), and equivalent to the calculated angle of the resultant between the horizontal and vertical forces on the coupling. The force, Fhs res shall be calculated as: Fhs res = sq . rt(Fh 2 + Fs 2) , where Fh = Dc and Fs = (9,81S)/1 000 + 0,8V |
|
3.5.2.4. |
The applied force shall vary between and . 0,05Fhs res 1,00Fhs res |
|
3.5.3. |
Static test on coupling locking device With hook type couplings it is also necessary to test the closure and any locking devices by means of a static force of 0,25 D acting in the direction of opening. The test shall not cause the closure to open and it shall not cause any damage. |
|
3.6. |
Drawbars |
|
3.6.1. |
Drawbars shall be tested in the same way as drawbar eyes (see paragraph 3.4.). The type approval authority or technical service may waive an endurance test if the simple design of a component makes a theoretical check of its strength possible. The design forces for the theoretical verification of the drawbar of centre axle trailers with a mass, C, of up to and including 3,5 tonnes shall be taken from ISO 7641/1: 1983. The design forces for the theoretical verification of drawbars for centre axle trailers having a mass, C, over 3,5 tonnes shall be calculated as follows: Fsp = (g × S/1 000) + V where the force amplitude V is that given in paragraph 2.11.4 of this Regulation. The permissible stresses based on the design masses for trailers having a total mass, C, over 3,5 tonnes shall be in accordance with paragraph 5.3 of ISO 7641/1: 1983. For bent drawbars (e.g. swan neck) and for the drawbars of full trailers, the horizontal force component Fhp = 1,0 × D shall be taken into consideration. |
|
3.6.2. |
For drawbars for full trailers with free movement in the vertical plane, in addition to the endurance test or theoretical verification of strength, the resistance to buckling shall be verified either by a theoretical calculation with a design force of 3,0 × D or by a buckling test with a force of 3,0 × D. The permissible stresses in the case of calculation shall be in accordance with paragraph 5.3 of ISO 7641/1: 1983. |
|
3.6.3. |
In the case of steered axles, the resistance to bending shall be verified by theoretical calculations or by a bending test. A horizontal, lateral static force shall be applied in the centre of the coupling point. The magnitude of this force shall be chosen so that a moment of 0,6 × Av × g (kNm) is exerted about the front axle centre. The permissible stresses shall be in accordance with paragraph 5.3 of ISO 7641/1: 1983. However, in the case where the steered axles form a twin, tandem, axle front carriage (steered bogie) the moment shall be increased to 0,95 × Av × g (kNm) |
|
3.7. |
Fifth wheel couplings |
|
3.7.1. |
The basic strength tests are a dynamic test and a static test (lifting test). Fifth wheel couplings intended for the positive steering of semitrailers shall be subject to an additional static test (bending test). For the purpose of the tests the fifth wheel coupling shall be equipped with all the fixings needed to attach it to the vehicle. The method of mounting shall be identical to that employed on the vehicle itself. It is not permissible to use a calculation method as an alternative to physical testing. |
|
3.7.2. |
Static tests |
|
3.7.2.1. |
Standard fifth wheel couplings designed for a steering wedge or similar device for the positive steering of semitrailers (see paragraph 2.7 of this Regulation) shall be tested for adequate strength by means of a static bending test within the working range of the steering device with the simultaneous application of fifth wheel load. The maximum permitted imposed vertical load, U, for the fifth wheel shall be applied vertically to the coupling in its operating position by means of a rigid plate of sufficient size to cover the coupling completely. The resultant of the applied load shall pass through the centre of the horizontal joint of the fifth wheel coupling. Simultaneously, a horizontal lateral force, representing the force needed for positive steering of the semitrailer, shall be applied to the flanks of the guide for the coupling pin. The magnitude of this force and the direction in which it acts shall be chosen so that a moment of 0,75m × D is exerted about the centre of the coupling pin by means of a force acting on a lever arm 0,5 m ± 0,1 m long. Permanent, plastic deformation up to 0,5 per cent of all nominal dimensions is permitted. There shall not be any cracking. |
|
3.7.2.2. |
A static lifting test shall be performed on all fifth wheel couplings. Up to a lifting force of Fa = g.U there shall not be any major permanent bending of the coupling plate over more than 0,2 per cent of its width. In the case of Class G50 standard fifth wheel couplings and comparable couplings for the same coupling pin diameter, there shall not be any separation of the coupling pin from the coupling with a lifting force of Fa = g × 2,5 U. In the case of non‐standard couplings using a pin diameter greater than 50 mm, for example 90 mm pin diameter couplings, the lifting force shall be: Fa = g × 1,6 U with a minimum value of 500 kN. The force shall be applied by means of a lever bearing on the coupling plate at one end and being raised at the other end at a distance of 1,0 to 1,5 m from the centre of the coupling pin — see Figure 24. The lever arm shall be at 90o to the direction of entry of the coupling pin into the coupling. If the worst case is obvious, this worst case has to be tested. If the worst case is not easy to determine, the type approval authority or technical service shall decide which side to test. Only one test is necessary. |
Figure 24
Lifting test on fifth wheel couplings
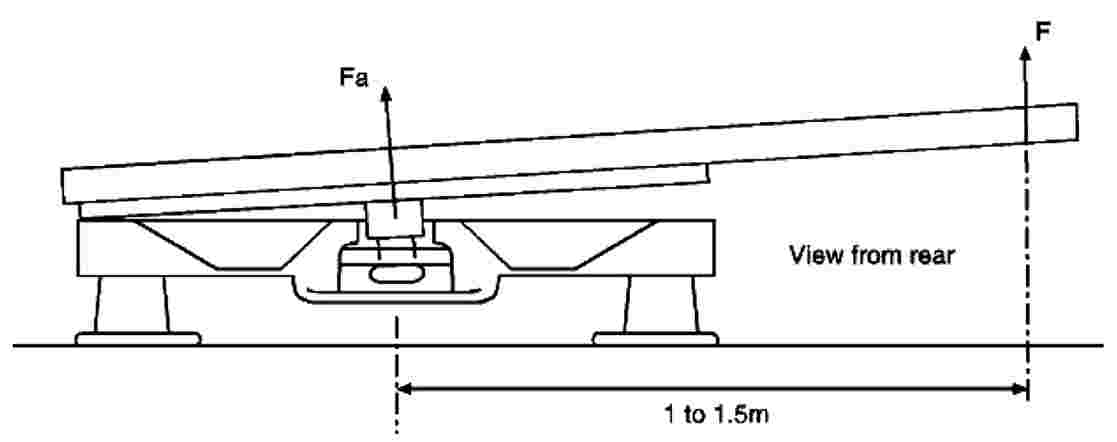
|
3.7.3. |
Dynamic test The fifth wheel coupling shall be subjected to alternating stress on a test rig (asynchronous dynamic test) with horizontal alternating and vertical pulsating forces acting simultaneously. |
|
3.7.3.1. |
In the case of fifth wheel couplings not intended for the positive steering of semitrailers, the following forces shall be used:
These two forces shall be applied in the longitudinal median plane of the vehicle with the lines of action of both forces Fso and Fsu passing through the centre of the joint of the coupling. The vertical force Fs alternates between the limits +g × 1,2 U and +g × 0,4 U and the horizontal force between ±0,6 D. |
|
3.7.3.2. |
In the case of fifth wheel couplings intended for the positive steering of semitrailers the following forces shall be used: Horizontal: Fhw = ±0,675 D Vertical: Fso and Fsu as in paragraph 3.7.3.1. The lines of action of the forces are as given in paragraph 3.7.3.1. |
|
3.7.3.3. |
For the dynamic test of fifth wheel couplings, a suitable lubricating material shall be placed between the coupling plate and the trailer plate so that the maximum coefficient of friction, μ ≤ 0,15. |
|
3.8. |
Mounting plates for fifth wheel couplings The dynamic test for fifth wheel couplings described in paragraph 3.7.3 and the static tests described in paragraph 3.7.2 shall also be applied to mounting plates. With mounting plates, it is sufficient to perform the lifting test on one side only. The test shall be based on the maximum designated installation height for the coupling, the maximum designated width and the minimum designated length of the mounting plate design. It is not necessary to carry out this test if the mounting plate in question is identical to one which has already undergone this test except that it is narrower and/or longer and the total height is lower. It is not permissible to use a calculation method as an alternative to physical testing. |
|
3.9. |
Fifth wheel coupling pins of semitrailers |
|
3.9.1. |
A dynamic test with alternating stress shall be performed on a sample mounted on a test rig. The testing of the coupling pin shall not be combined with the testing of the fifth wheel coupling. The test shall be conducted so that the force is also applied to the fixings needed for attaching the coupling pin to the semitrailer. It is not permissible to use a calculation method as an alternative to physical testing. |
|
3.9.2. |
A dynamic test with an alternating horizontal force of Fhw = ±0,6 D shall be applied to the coupling pin in the operating position. The line of action of the force shall pass through the centre of the smallest diameter of the cylindrical part of the coupling pin having a diameter of 50,8 mm for Class H50 (see annex 5, Figure 18). |
ANNEX 7
INSTALLATION AND SPECIAL REQUIREMENTS
1. INSTALLATION AND SPECIAL REQUIREMENTS
|
1.1. |
Attachment of coupling balls and towing brackets |
|
1.1.1. |
Coupling balls and towing brackets shall be attached to vehicles of categories M1, M2 (below 3,5 t maximum permissible mass) and N1 (1) in a manner which conforms to the clearance and height dimensions given in Figure 25. The height shall be measured at the vehicle loading conditions given in appendix 1 to this annex. The height requirement shall not apply in the case of category G off‐road vehicles as defined in annex 7 of the Consolidated Resolution on the Construction of Vehicles (R.E.3)(document TRANS/WP.29/78/Rev.1/Amend.2). |
|
1.1.1.1. |
The clearance space shown in Figures 25a and 25b may be occupied by non‐demountable equipment, such as a spare wheel, provided that the distance from the centre of the ball to a vertical plane at the extreme rearmost point of the equipment does not exceed 300 mm. The equipment shall be mounted to allow adequate access for coupling and uncoupling without risk of injury to the user and without affecting articulation of the coupling. |
|
1.1.2. |
For coupling balls and towing brackets the vehicle manufacturer shall supply mounting instructions and state whether any reinforcement of the fixing area is necessary. |
|
1.1.3. |
It shall be possible to couple and uncouple ball couplings when the longitudinal axis of the ball coupling in relation to the centre line of the coupling ball and mounting: is rotated horizontally 60o to right or left, (β = 60o, see Figure 25); is rotated vertically 10o up or down (α = 10o, see Figure 25); is rotated axially 10o to right or left. |
Figure 25(a)
Clearance space for, and height of, coupling ball — side view
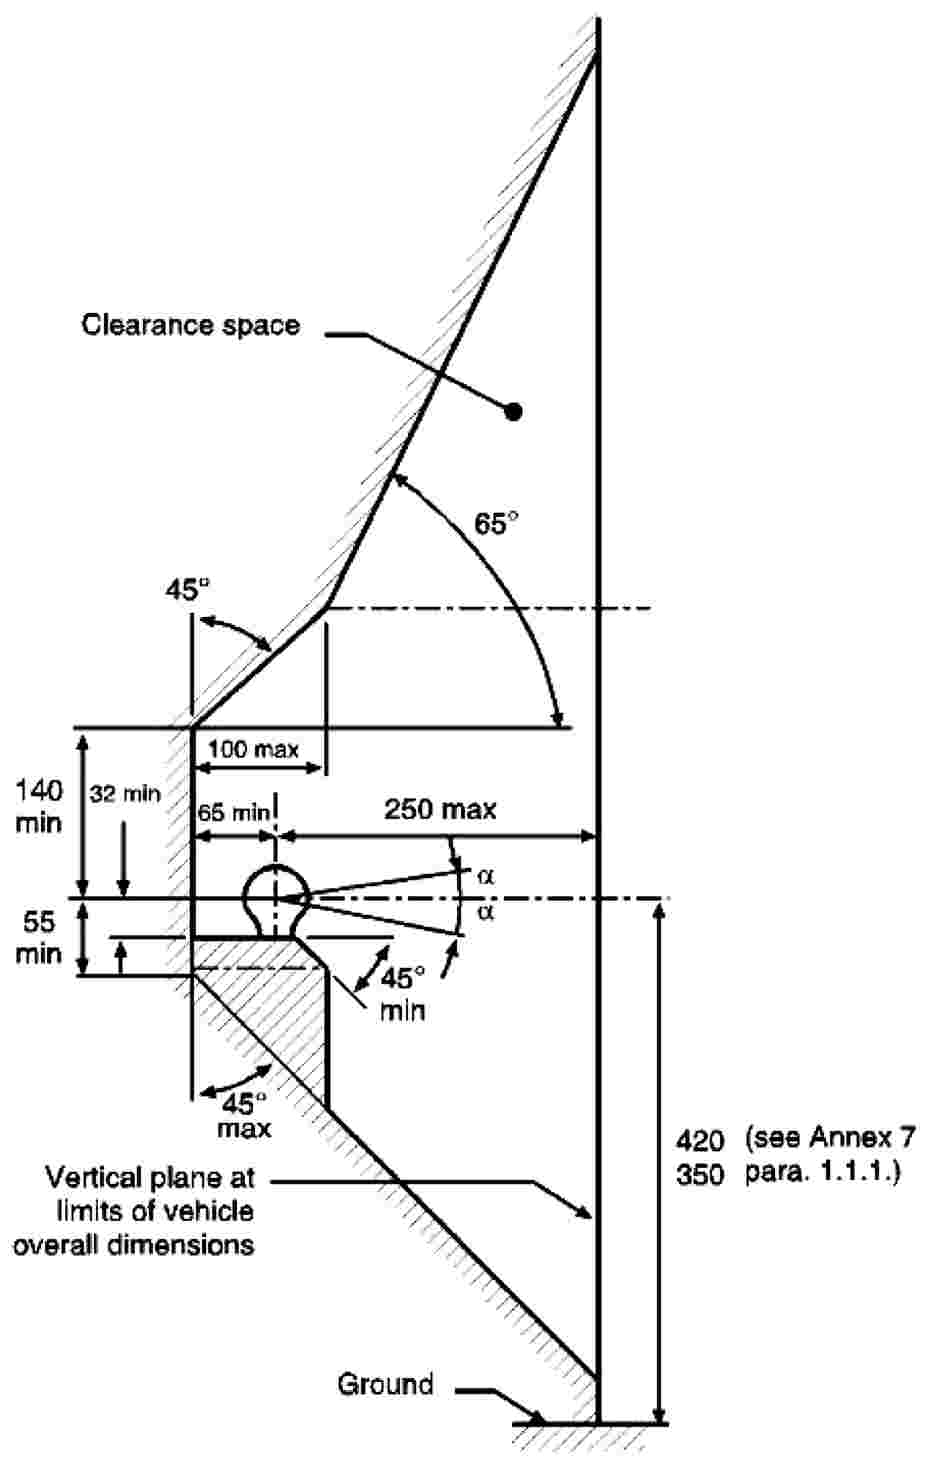
Figure 25(b)
Clearance space for coupling ball — plan view
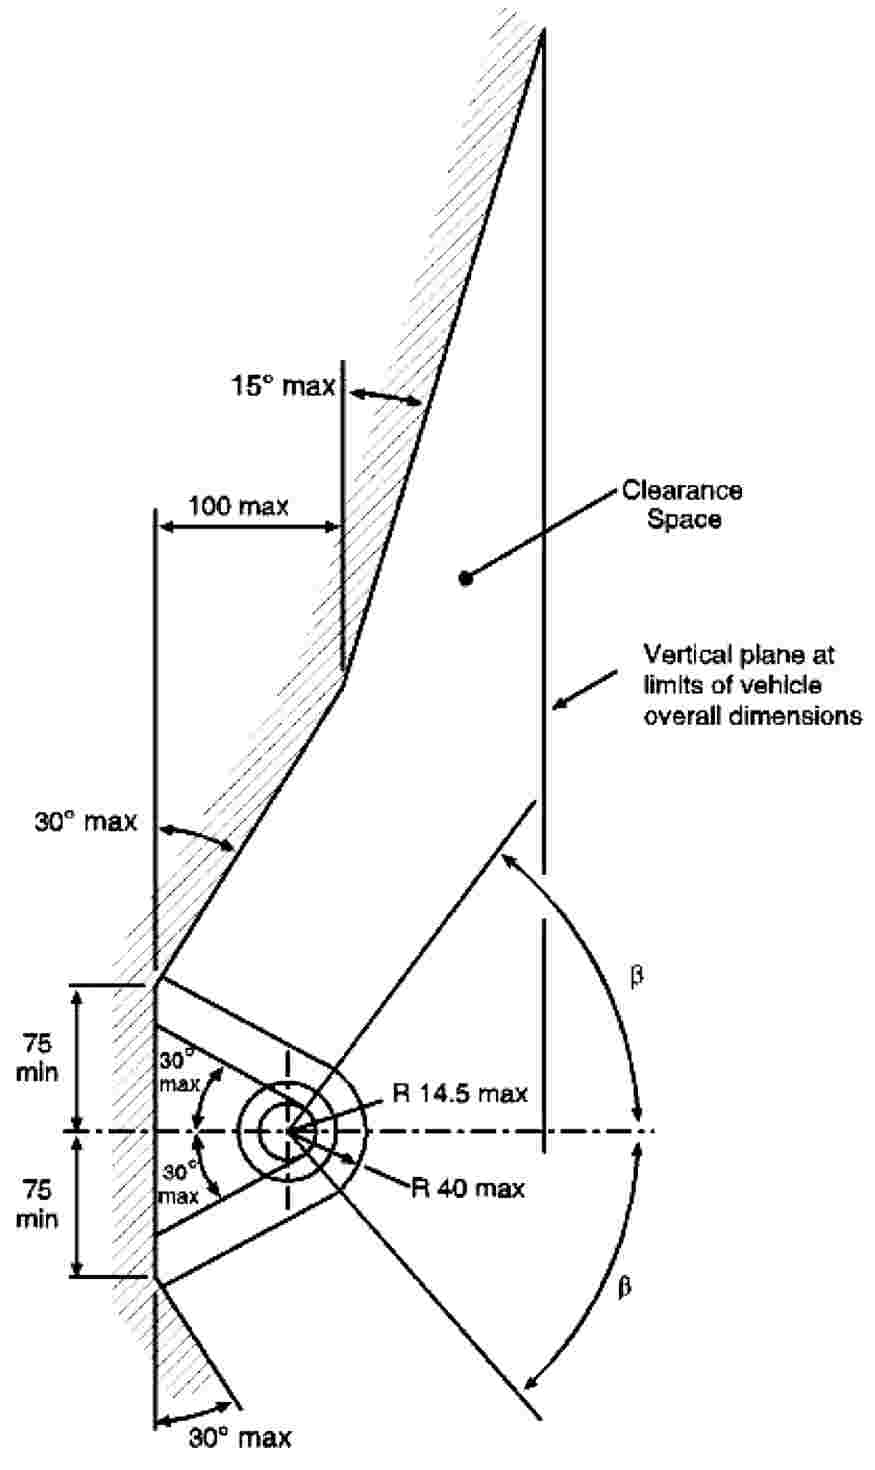
|
1.1.4. |
When the trailer is not coupled to the towing vehicle, the mounted towing bracket and coupling ball shall not obscure the mounting space provided for the rear registration plate or affect the visibility of the rear registration/licence plate of the towing vehicle. If the coupling ball or other items do obscure the rear registration plate they shall be removable or repositionable without the use of tools except, for example, an easily operated (i.e. an effort not exceeding 20 Nm) release key which is carried in the vehicle. |
|
1.2. |
Attachment of coupling heads |
|
1.2.1. |
Class B coupling heads are permitted for trailers of maximum mass up to and including 3,5 tonnes. With the trailer horizontal and carrying the maximum permitted axle load, coupling heads shall be fitted so that the centre line of the spherical area into which the ball fits is 430 ±35 mm above the horizontal plane on which the wheels of the trailer rest. In the case of caravans and goods trailers, the horizontal position is regarded as when the floor or loading surface is horizontal. In the case of trailers without such a reference surface (e.g. boat trailers or similar) the trailer manufacturer shall give an appropriate reference line defining the horizontal position. The height requirement shall apply only to trailers intended to be attached to vehicles mentioned in paragraph 1.1.1. of this annex. In all cases the horizontal position shall be determined to within ±1o. |
|
1.2.2. |
It shall be possible to operate the coupling heads safely within the free space of the coupling ball given in Figures 25a and 25b, up to angles of α = 25o and β = 60o. |
|
1.3. |
Attachment of drawbar couplings and mounting blocks |
|
1.3.1. |
Mounting dimensions for standard drawbar couplings: In the case of types of standard drawbar couplings the mounting dimensions on the vehicle given in Figure 15 and Table 10 must be met. |
|
1.3.2. |
Need for remote controlled couplings If one or more of the following requirements regarding easy and safe operation (paragraph 1.3.3.), accessibility (paragraph 1.3.5.) or clearance for the hand lever (paragraph 1.3.6.) cannot be met, a coupling with a remote control device as described in annex 5, paragraph 12.3. shall be used. |
|
1.3.3. |
Easy and safe coupling operation Drawbar couplings shall be mounted on the vehicle in such a manner that they are easy and safe to operate. In addition to the functions of opening (and closing, if applicable) this also includes checking the position of the indicator for the closed and locked positions of the coupling pin (by sight and touch). In the area in which the person operating the coupling has to stand, there shall not be any points of possible danger such as sharp edges, corners, etc. inherent in the design unless these are protected so that injury is unlikely. The way of escape from this area shall not be restricted or barred on either side by any objects attached to either the coupling or the vehicles. Any underrun protection device shall not prevent the person adopting a suitable position to operate the coupling. |
|
1.3.4. |
Minimum angle for coupling up and uncoupling Coupling and uncoupling of the drawbar eye shall be possible when the longitudinal axis of the drawbar eye in relation to the centre line of the jaw is simultaneously rotated: 50o horizontally to right or left; 6o vertically up or down. 6o axially to right or left. This requirement shall also apply to Class K hook type couplings. |
|
1.3.5. |
Accessibility The distance between the centre of the coupling pin and the edge of the bodywork of the vehicle shall not exceed 550 mm. Where the distance exceeds 420 mm, the coupling shall be fitted with an actuation mechanism which will allow safe operation at a maximum distance of 420 mm from the outer board of the bodywork. The distance of 550 mm may be exceeded as follows, provided that technical necessity can be demonstrated and that easy and safe actuation of the drawbar coupling is not adversely affected:
|
|
1.3.6. |
Clearance for the hand lever In order to permit safe operation of drawbar couplings there shall be adequate free space around the hand lever. The clearance illustrated in Figure 26 is regarded as sufficient. If different types of standard drawbar couplings are intended to be fitted to the vehicle, the clearance shall be such that the conditions are also satisfied for the largest size of coupling of the appropriate class given in annex 5, paragraph 3. |
Figure 26
Hand lever clearance
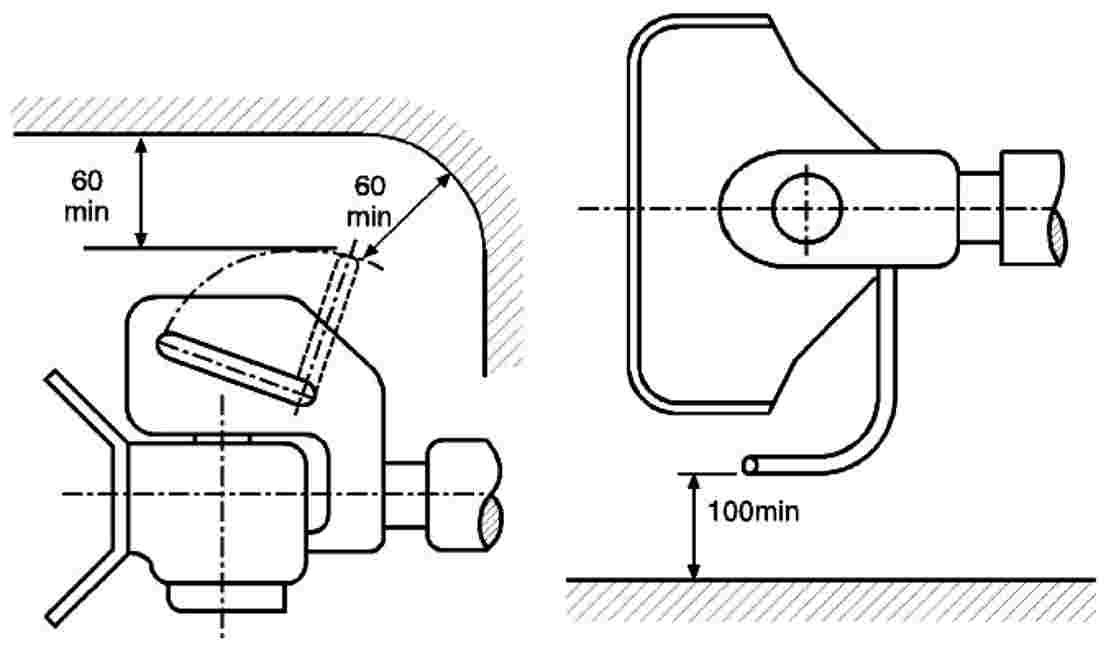
The clearance dimensions are also applicable as appropriate for drawbar couplings having hand levers pointing downwards or of a different design.
The clearance shall also be maintained within the specified minimum angle for coupling up and uncoupling given in paragraph 1.3.4 of this annex.
|
1.3.7. |
Clearance for free movement of drawbar coupling The drawbar coupling attached to the vehicle shall have a minimum clear gap of 10 mm from every other part of the vehicle taking into account all possible geometrical positions given in annex 5, paragraph 3. If different types of standard drawbar couplings are intended to be fitted to the vehicle type, the clearance shall be such that the conditions are also satisfied for the largest possible coupling of the appropriate class stated in annex 5, paragraph 3. |
|
1.3.8. |
Acceptability of drawbar couplings with a special joint for vertical rotation — see annex 5, paragraph 3.4. Couplings having a cylindrical pin and which achieve vertical rotation for the coupled drawbar eye by means of a special joint will only be permitted when technical necessity can be demonstrated. This may be the case, for example, on rear tippers when the coupling head shall be hinged, or with the couplings of heavy transporters when for strength reasons the use of a cylindrical coupling pin is necessary. |
|
1.4. |
Attachment of drawbar eyes and drawbars on trailers. |
|
1.4.1. |
Drawbars for centre axle trailers shall have a support device which is adjustable in height if bearing mass at the drawbar eye on the trailer exceeds 50 kg, when the trailer is uniformly loaded to its technically permissible maximum mass. |
|
1.4.2. |
When attaching drawbar eyes and drawbar to centre‐axle trailers with a maximum mass, C, of more than 3,5 tonnes and more than one axle, the trailers shall be equipped with device for axle load sharing. |
|
1.4.3. |
Hinged drawbars shall be clear of the ground. They shall not fall below a height of 200 mm from the ground when released from the horizontal position. See also annex 5, paragraphs 5.3 and 5.4. |
|
1.5. |
Attachment of fifth wheel couplings, mounting plates and coupling pins on vehicles. |
|
1.5.1. |
Class G50 fifth wheel couplings shall not be mounted directly on the vehicle frame unless permitted by the vehicle manufacturer. They shall be fixed to the frame by means of a mounting plate and the installation instructions provided by the vehicle manufacturer and coupling manufacturer shall be followed. |
|
1.5.2. |
Semitrailers shall be equipped with landing gear or any other equipment which allows uncoupling and parking of the semitrailer. If semitrailers are equipped so that the connection of the coupling devices, the electrical systems and braking systems can be effected automatically, the trailer shall have landing gear which retracts from the ground automatically after the semitrailer has been coupled up. These requirements shall not apply in the case of semitrailers designed for special operations where they are normally only separated in a workshop or when loading and unloading in specifically designed operating areas. |
|
1.5.3. |
The fixing of the fifth wheel coupling pin to the mounting plate on the semitrailer shall be as instructed by the vehicle manufacturer or the manufacturer of the fifth wheel coupling pin. |
|
1.5.4. |
If a semitrailer is equipped with a steering wedge it shall meet the requirements as described in annex 5, paragraph 7.8. |
2. REMOTE INDICATION AND CONTROL
|
2.1. |
When installing remote indication and control devices any relevant requirements given in annex 5, paragraph 12 shall be taken into account. |
(1) See definitions in Regulation No 13 annexed to the 1958 Agreement concerning the Adoption of Uniform Technical Prescriptions for Wheeled Vehicles, Equipment and Parts which can be Fitted and/or be Used on Wheeled Vehicles and the Conditions for Reciprocal Recognition of these Prescriptions. The definition is also contained in annex 7 of the Consolidated Resolution on the Construction of Vehicles (R.E.3) (document TRANS/WP.29/78/Rev.1/Amend.2).
ANNEX 7
Appendix 1
LOADING CONDITIONS FOR MEASUREMENT OF COUPLING BALL HEIGHT
|
1. |
The height shall be as specified in annex 7, paragraph 1.1.1. |
|
2. |
In the case of M1 category vehicles (1) the vehicle mass at which this height shall be measured shall be declared by the vehicle manufacturer and shall be given in the Communication form (annex 2). The mass shall be either the maximum permissible mass, distributed between the axles as declared by the vehicle manufacturer or the mass given by loading the vehicle in accordance with paragraph 2.1 of this appendix. |
|
2.1. |
The maximum figure for the mass in running order as declared by the towing vehicle manufacturer (see paragraph 6. of the Communication form, annex 2); plus |
|
2.1.1. |
two masses, each of 68 kg, positioned in the outer seating position of each row of seats, with the seats in the rearmost adjustable position for normal driving and travel, and with the masses located: |
|
2.1.1.1. |
for original equipment coupling devices and components submitted for approval by the vehicle manufacturer, approximately at a point located at 100 mm in front of the “R” point for adjustable seats and 50 mm in front of the “R” point for other seats, the “R” point being determined according to Regulation No 14 paragraph 5.1.1.2.; or |
|
2.1.1.2. |
for coupling devices and components submitted for approval by an independent manufacturer and intended for replacement market fitting, approximately at the position of a seated person; |
|
2.1.2. |
In addition, for each mass of 68 kg, an additional mass of 7 kg allowance for personal luggage shall be distributed evenly in the luggage area of the vehicle; |
|
3. |
In the case of N1 category vehicles (2), the vehicle mass at which this height shall be measured shall be: |
|
3.1. |
The maximum permissible mass, distributed between the axles as declared by the towing vehicle manufacturer (see paragraph 6. of the Communication form, annex 2). |
(1) As defined in the Consolidated Resolution on the Construction of Vehicles (R.E.3), annex 7 (Document TRANS/WP.29/78/Rev.1/Amend.2).
(2) As defined in the Consolidated Resolution on the Construction of Vehicles (R.E.3), annex 7 (Document TRANS/WP.29/78/Rev.1/Amend.2).
